How to build a more secure personal computer

Tags: Coreboot, F2A85-M, F2A85-M PRO, A10-5800K
Last Update: Jan 2021

This guide is based on the BIOS UEFI replacement called Coreboot which runs on an ASUS F2A85-M or F2A85-M PRO mainboard with an AMD A10-5800K CPU with integrated graphics.

1. Introduction and aim

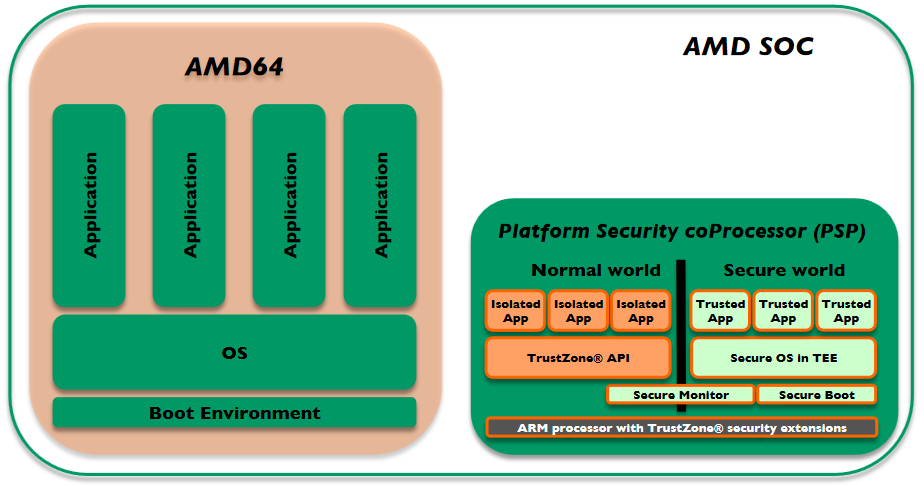
This initial idea came up with the uprising problems and vulnerabilities of Intel ME and AMD Secure Technology (PSP). After having researched several alternatives without running those (in)secure technologies I was looking for very specific hardware to meet the requirements on security as mentioned in the pinetree of open and secure classical computing.

The aim is to provide a comprehensive guide which allows the daily user to gain a higher level of security. The daily user shall be empowered to get back the control about every piece of hardware within the computer system. In general hardware is always run by the so-called firmware. Firmware is software which is in the closest control of the underlying hardware to make it work as intended. So firmware is needed by the all BIOS/UEFI computer systems we know. Based on these hardware firmwares the central BIOS/UEFI unit is able to tell other computer parts how to cooperate. The newer the hardware, the worse the availability of open firmware. In fact in most cases the availability of open code is zero, because vendors assume that keeping the source code secret (closed source code) increases the security of the product. Nowadays we’ve learned by many lessons that this conviction is wrong. It’s a fact that every source contains errors which might be exploitable if they are found. The more people access a source code, the better this code is reviewed and the fewer errors are included.

Conclusion: Due to this circumstance sometimes developers have to use vendor’s original binary code (firmware) to get the hardware to work at all. That means that wide limitations are accepted by almost all vendors. Security can only be guaranteed by open source code. This leads to a conflict of objectives: On one hand we want a secure system and on the other hand we don’t want to lose comfort by leaving out the functionality which the vendor has placed within his (closed) firmware.

Maybe you take this into account before you support a certain vendor by buying his hardware the next time.

Since it’s practically almost impossible to use every piece of hardware out there by open code, we need to find the best compromise between functionality and security:

  • free and open source code
  • running Coreboot or even Libreboot
  • running Windows and GNU/Linux
  • as little as possible of (closed) firmware
  • enough performance to get work done

2. Software we will need

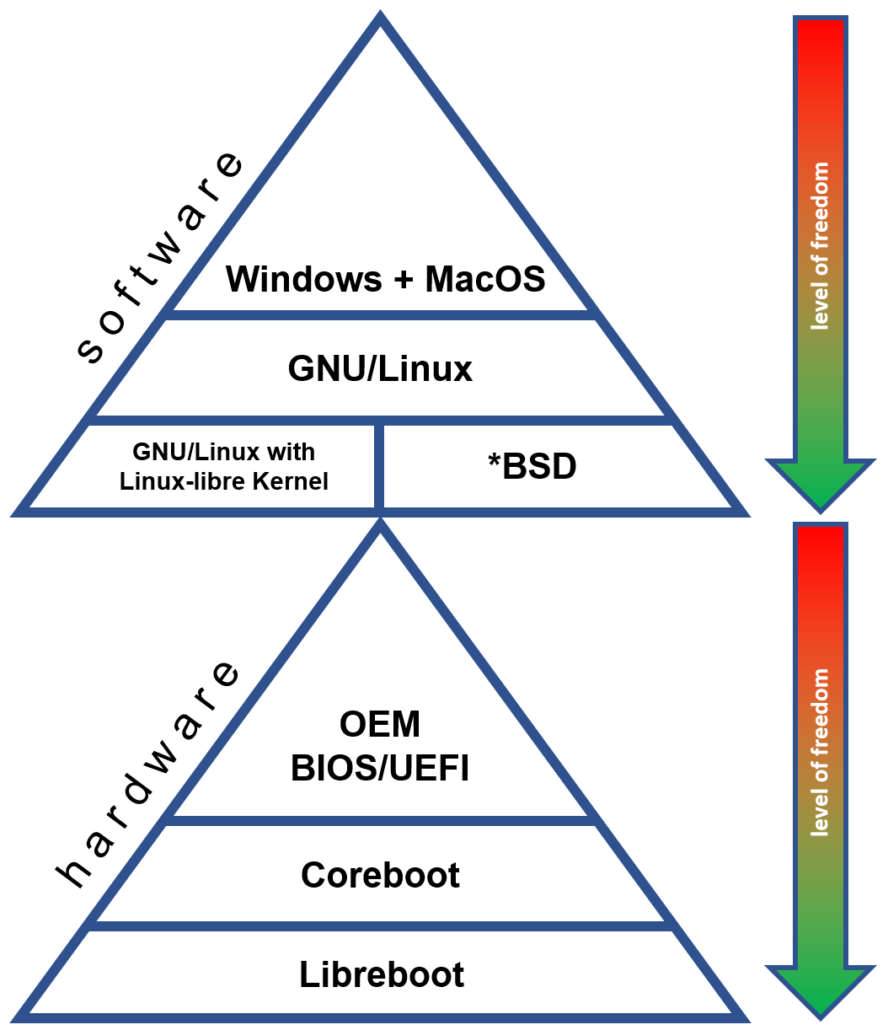
  • For booting the system we will use Coreboot instead of the vendor’s BIOS/UEFI. Libreboot is even a “better” option but – as mentioned in other posts – unfortunately very few and old boards are supported.
  • As an operating system you can choose one from the recommendations. I prefer using Manjaro GNU/Linux with the free driver stack option which you can choose while booting the installation disk from a pen-drive. In my view this is the best mix between bleeding edge development, security and user comfort.
  • If you prefer to build the Coreboot ROM on your own, you need a Linux on which you can compile the Coreboot sources. Ubuntu is usually a good choice.
  • If you prefer to extract the VGA BIOS on your own, you will also need to run a live Linux from a pen-drive for extraction.

3. Hardware you will need (mostly second hand)

Hardware usedNotes$
Mainboard
F2A85-M PRO
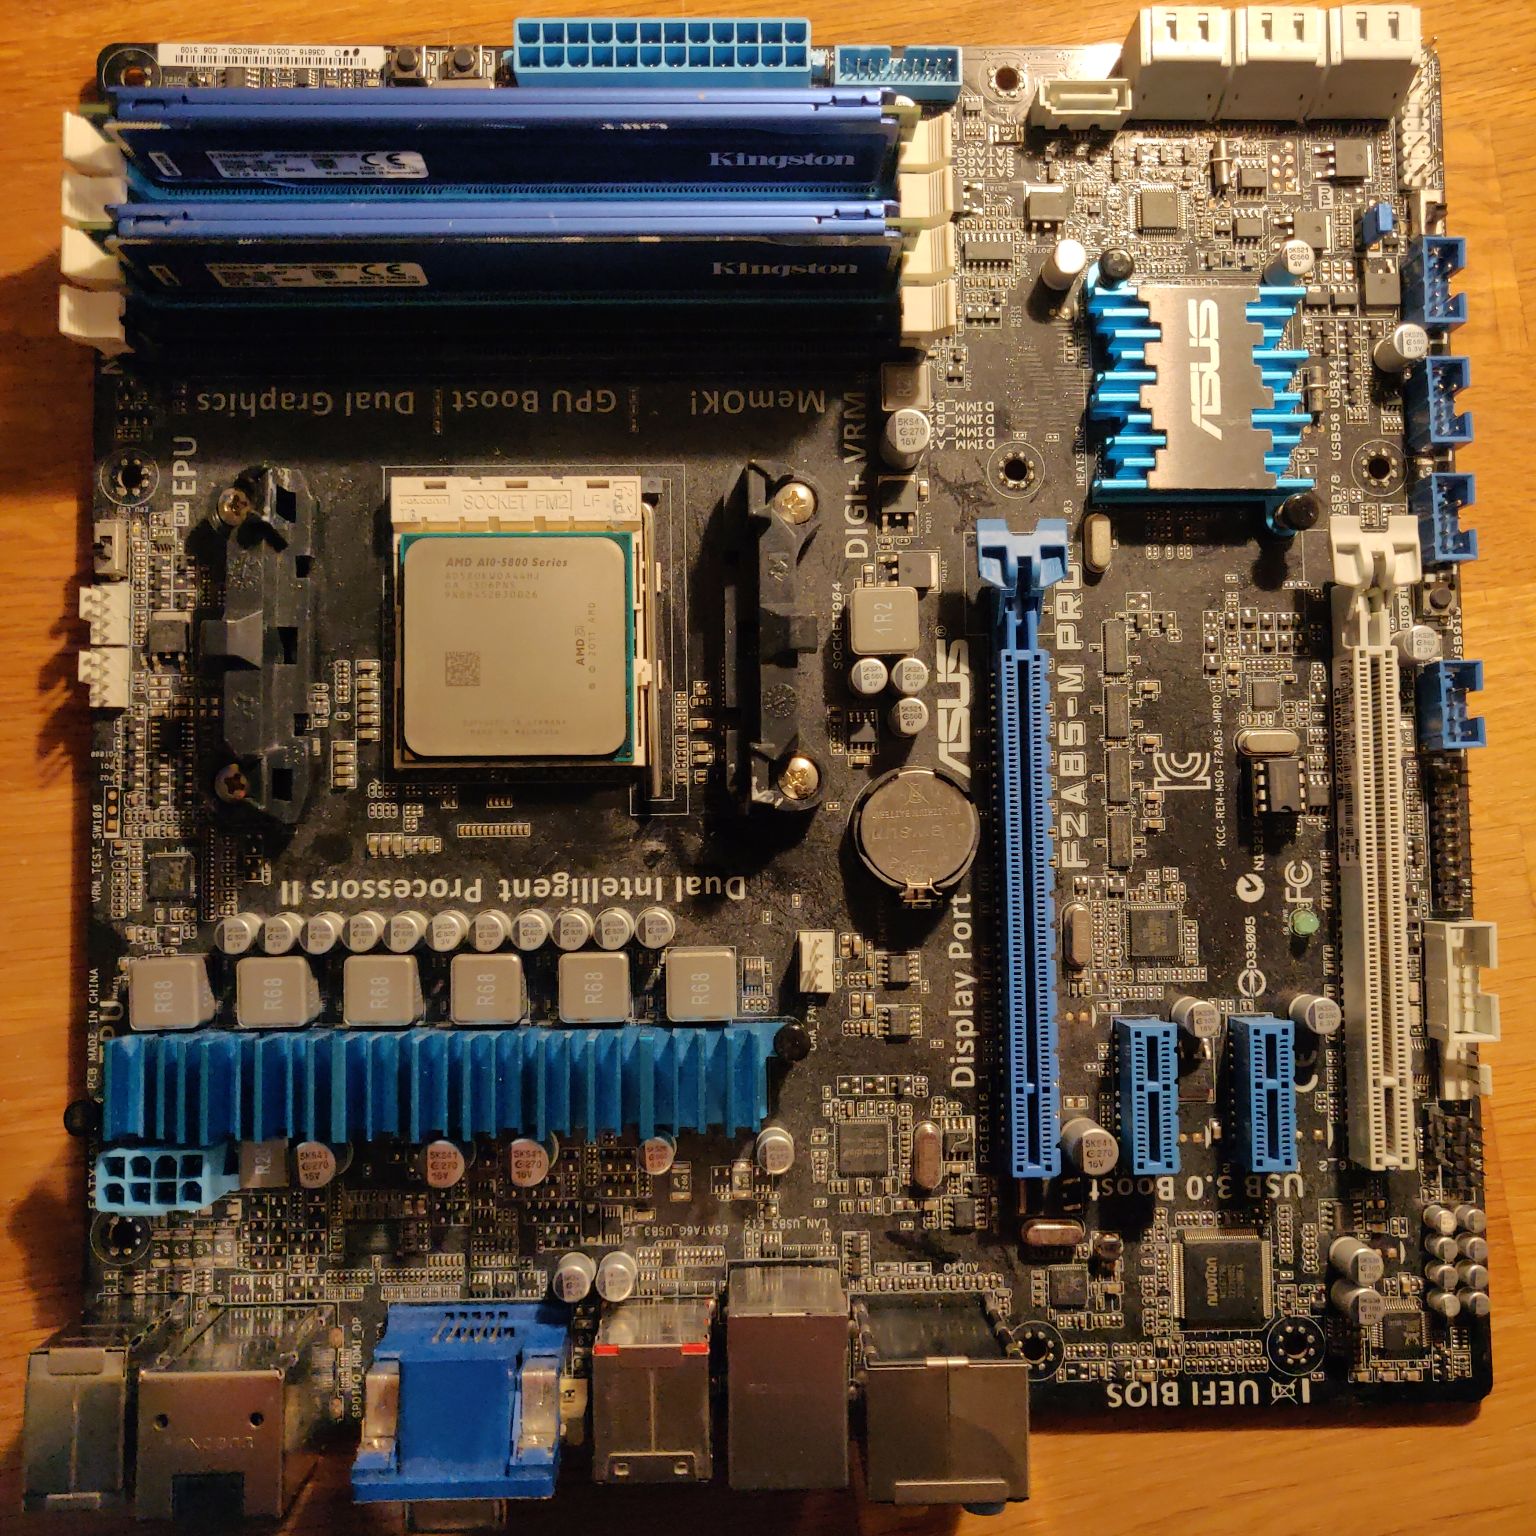
Both the ASUS F2A85-M or F2A85-M PRO are currently the best choice for a desktop platform, because it is widely supported by Coreboot.40
CPU
AMD A10-5800K
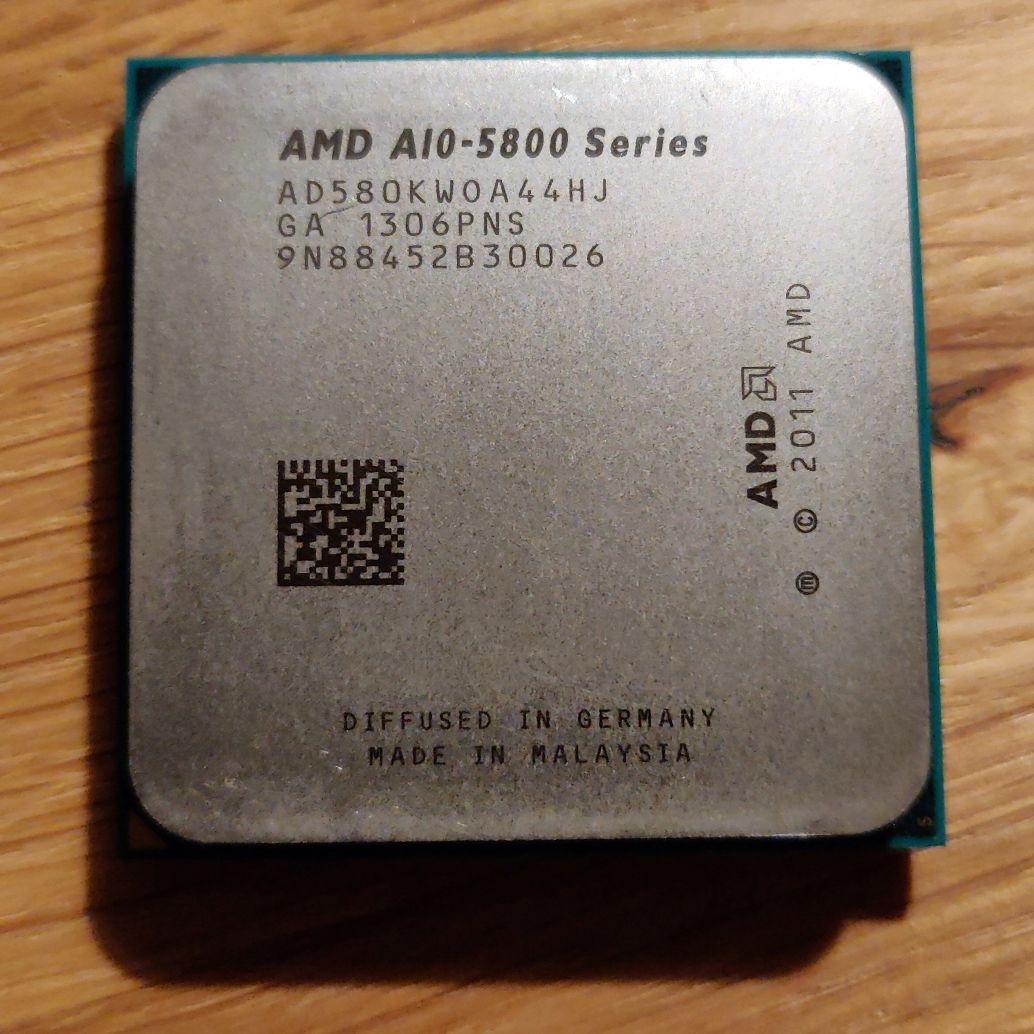
As we found out before AMD’s Piledriver and Steamroller CPU architectures (codenames Trinity, Richland and Kaveri) are the latest ones which does NOT include those (in)secure technologies. The AMD A10-5800K or AMD A10-6800K are the most compatible and powerful CPU/APU you can run on with Coreboot on this mainboard.40
CPU Cooler
Xilence A250PWM
Pick any adequate CPU cooler you want which is supporting the FM2 socket. You can use a good old Arctic Freezer A30 with a silent 120mm fan (~ 30 $). If you want something new you can take the Xilence A250PWM (XC035).10
Memory
Kingston KHX1600C10D3B1K2
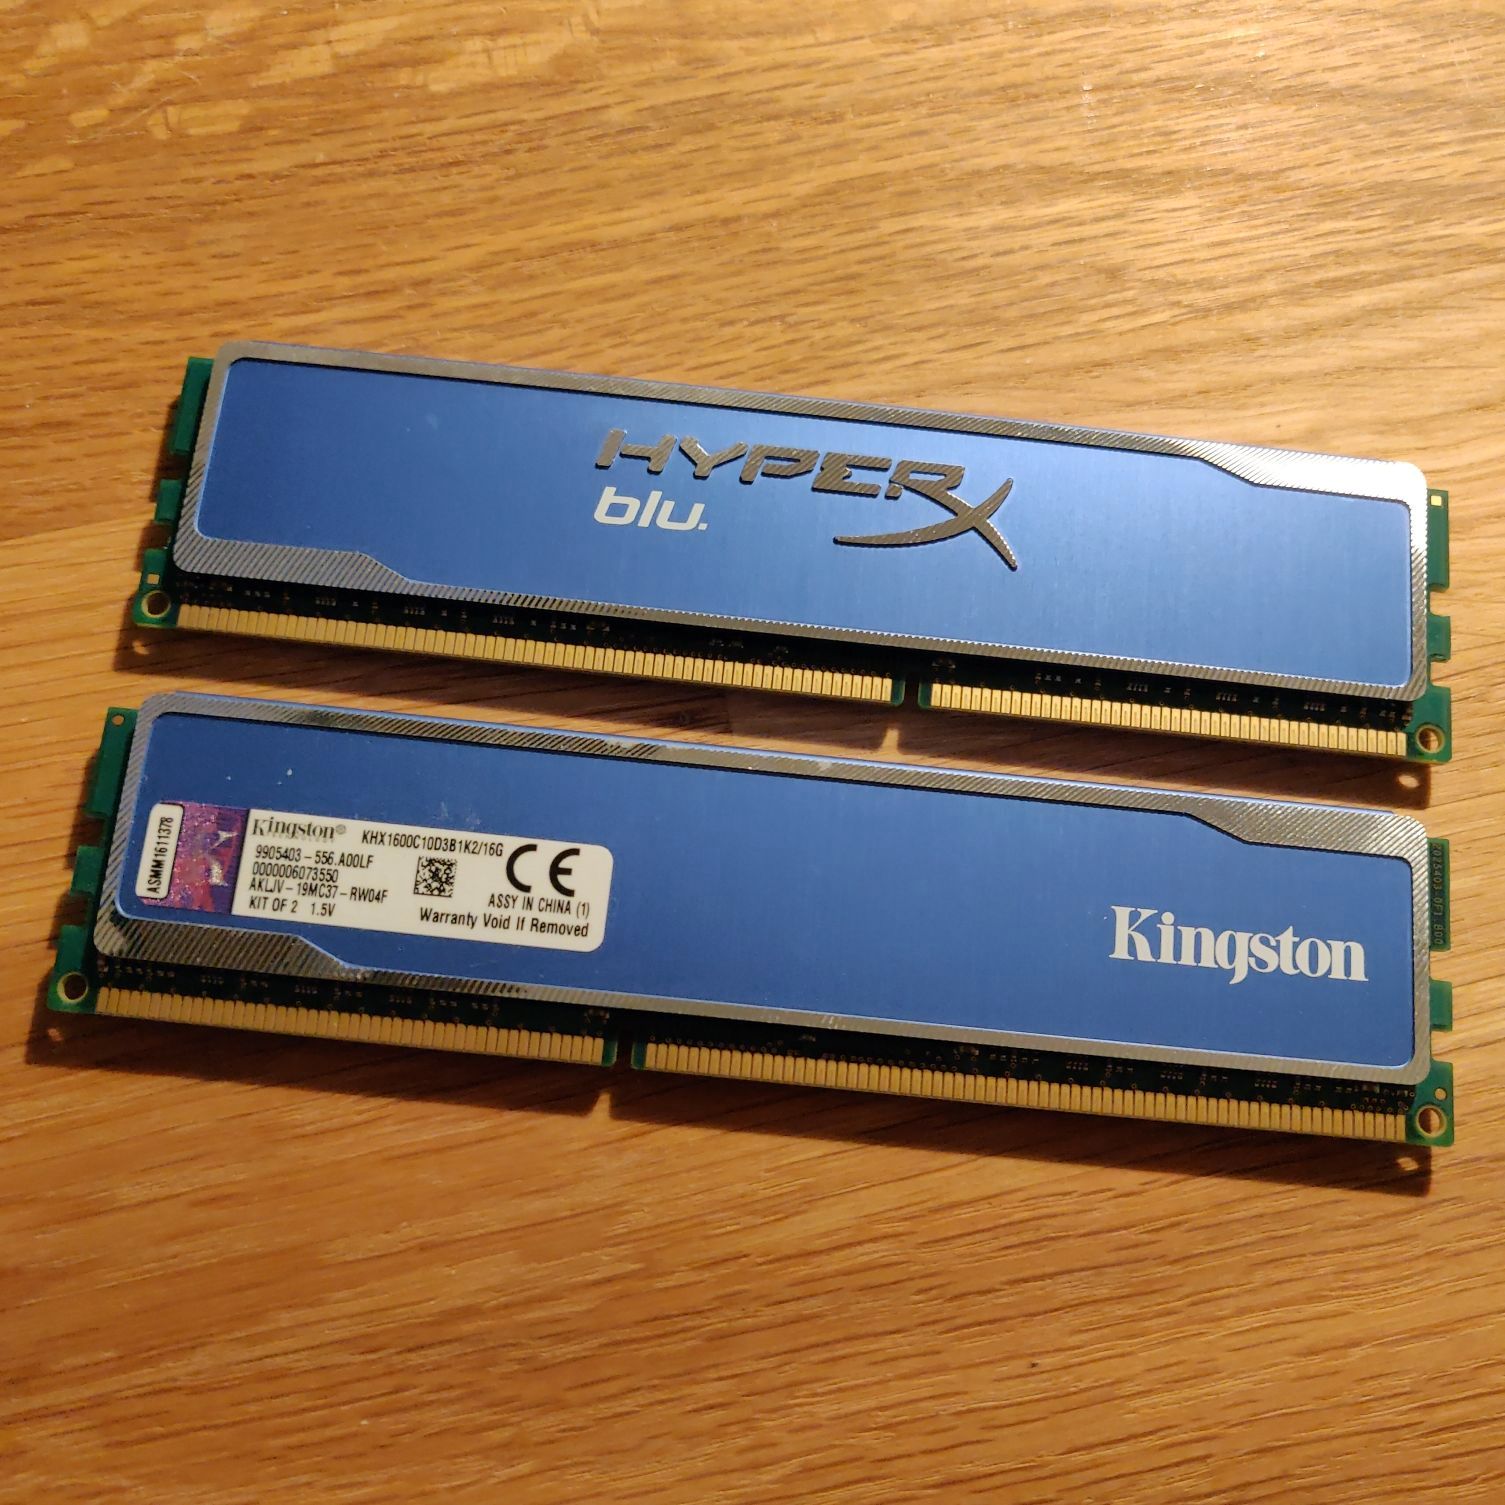
DDR3-1866 RAM is the fastest RAM speed our CPU is supporting. The amount depends just on your personal demands. With a minimum of 8 GB we should be good to go. I’ve been successful with Corsair CML16GX3M2A1600C100 and Kingston KHX1600C10D3B1K2; but there are many many others that will work, too.50
HDD/SSDWe need a SATA hard-drive for the operating system. Think about using a SSD if you want a fast system. Remember to encrypt your partitions and/or files – especially if you are using a SSD.50
GPUIn the CPU above the graphics are onboard and included within the CPU. So there is no need to buy a dedicated one.0
Power SupplyAs a power supply any standard ATX AC adaptor will work.30
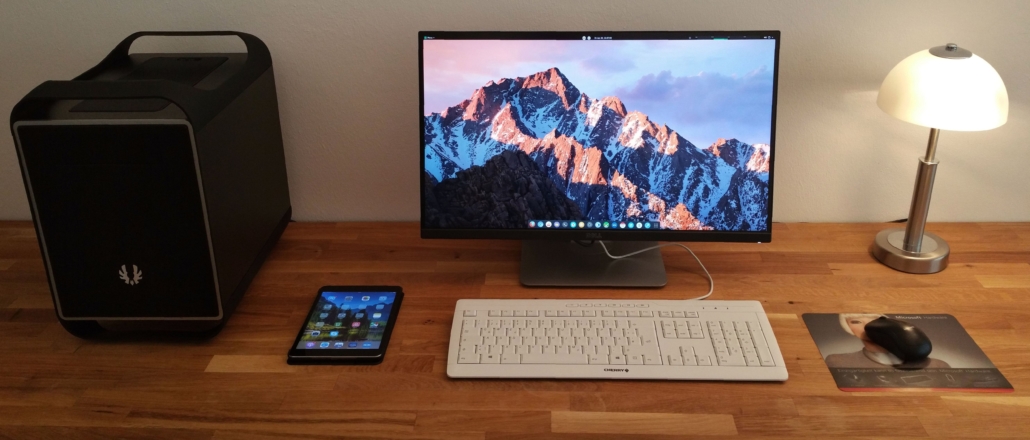
Case
Bitfenix Prodigy M
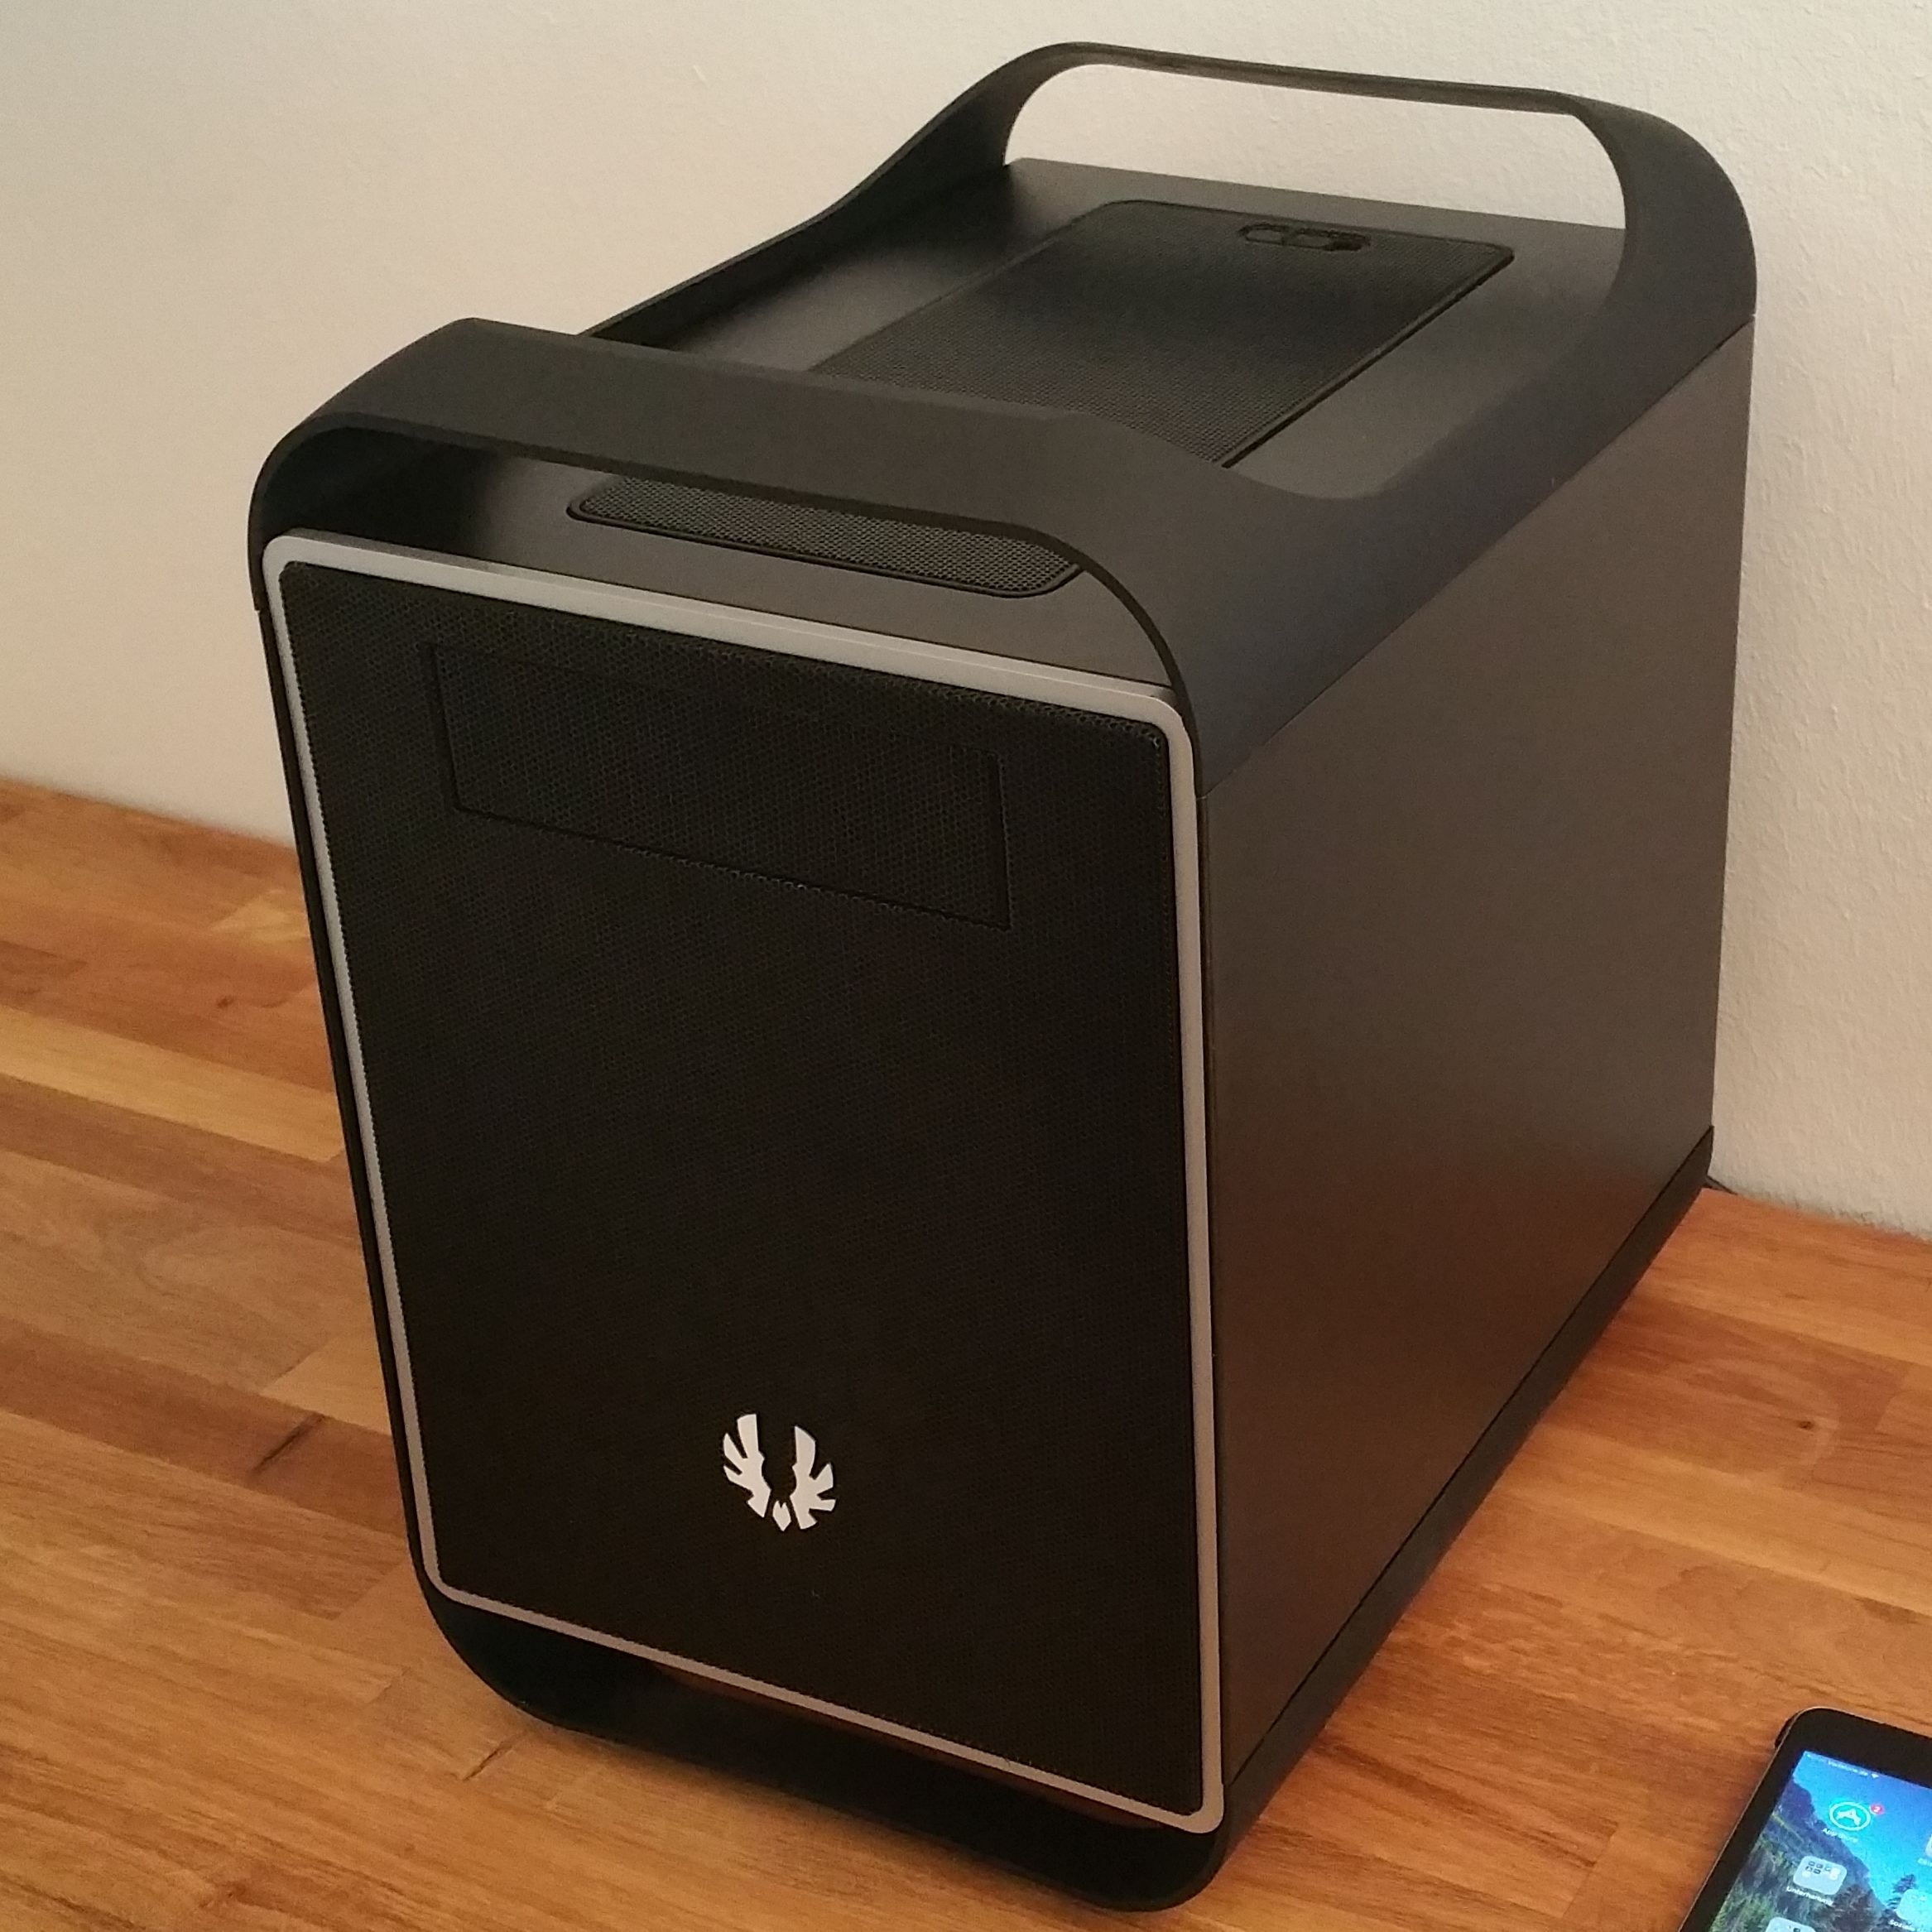
Choose a computer case according to your personal preferences. I like the Bitfenix Prodigy M. Remember: Not all micro ATX cases are suitable for taking bigger/higher CPU coolers. This one takes and bigger CPU cooler like the Freezer A30 perfectly.50
Flashtool
CH341A
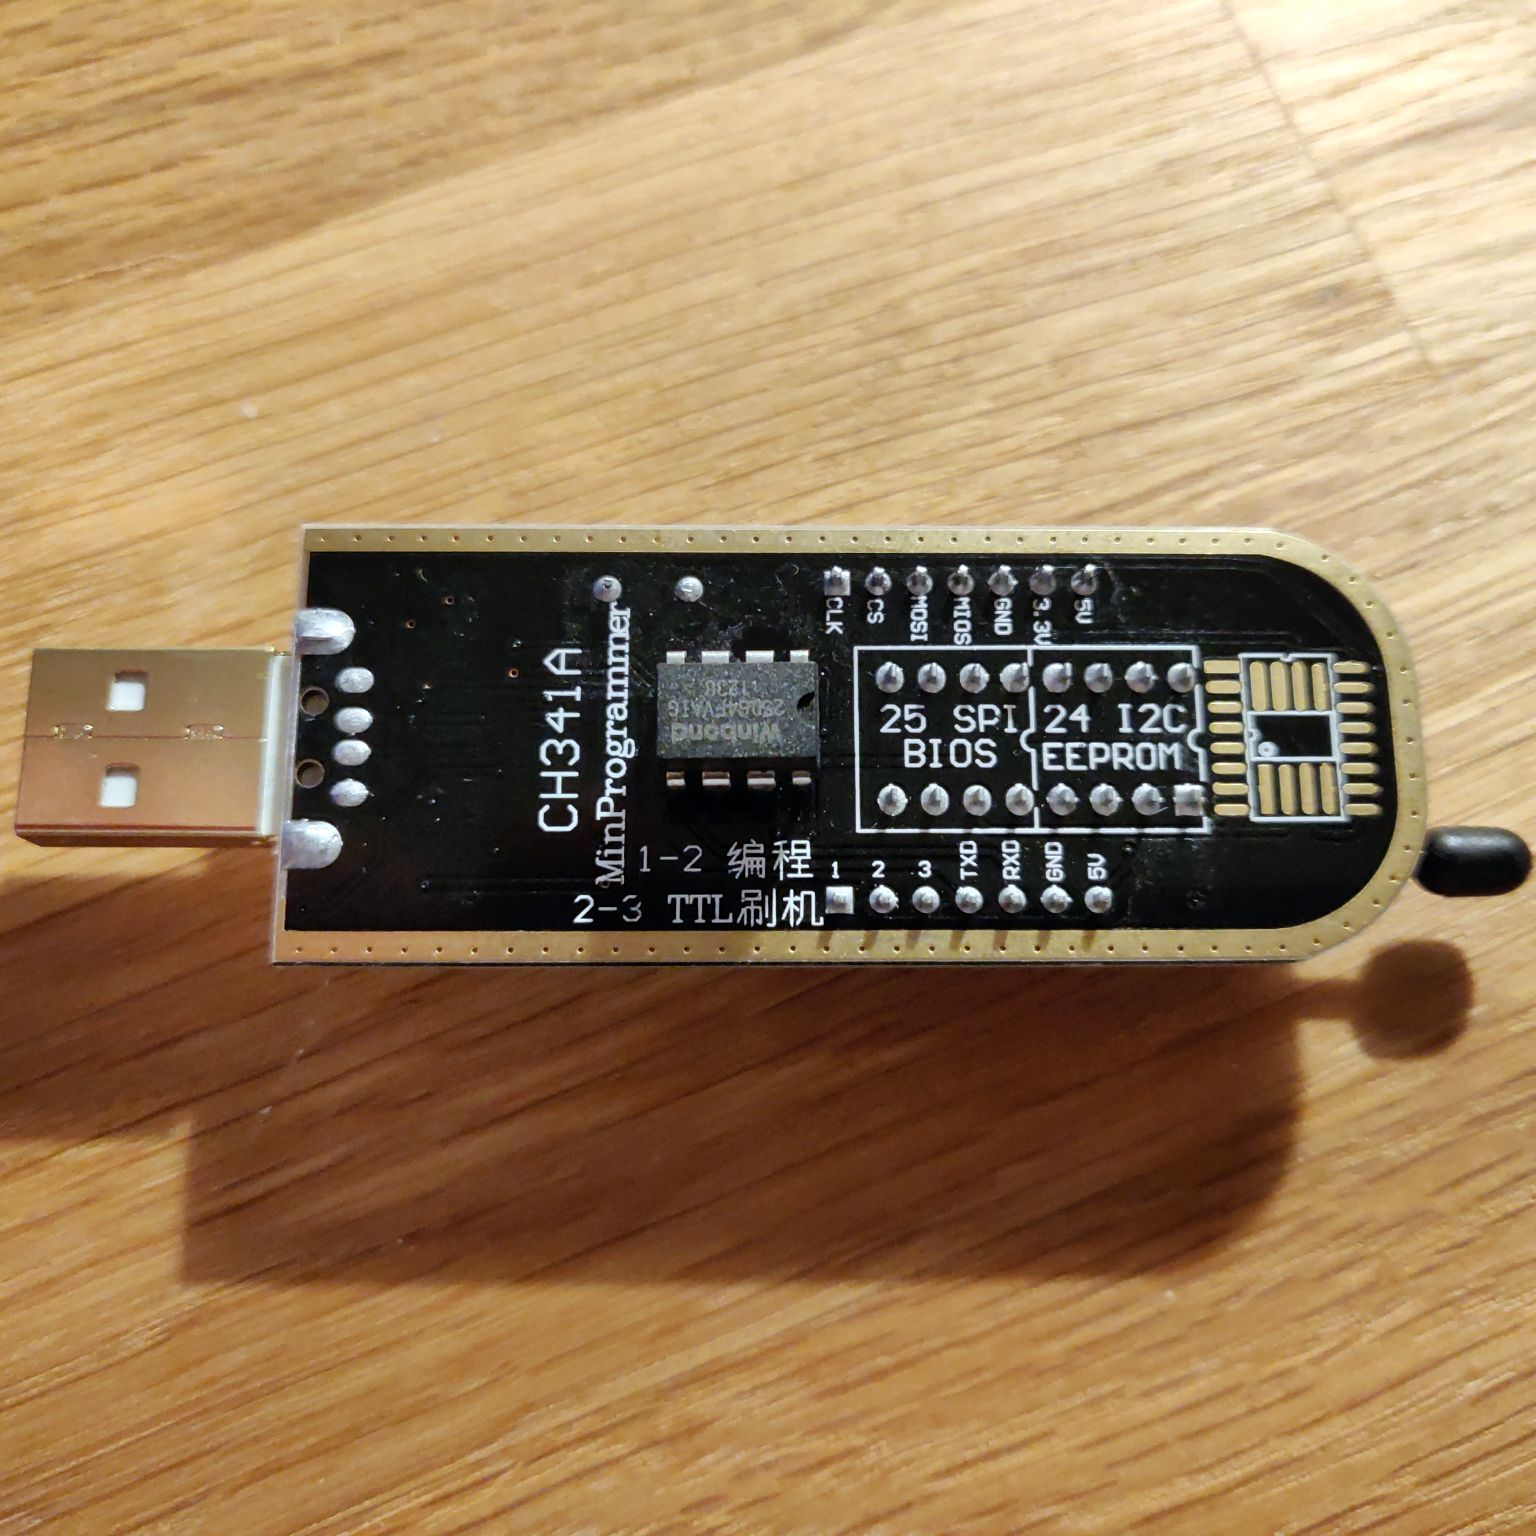
In order to flash the BIOS chip via SPI we need a CH341A USB Programmer.15
BIOS chip
W25Q64FVAIG
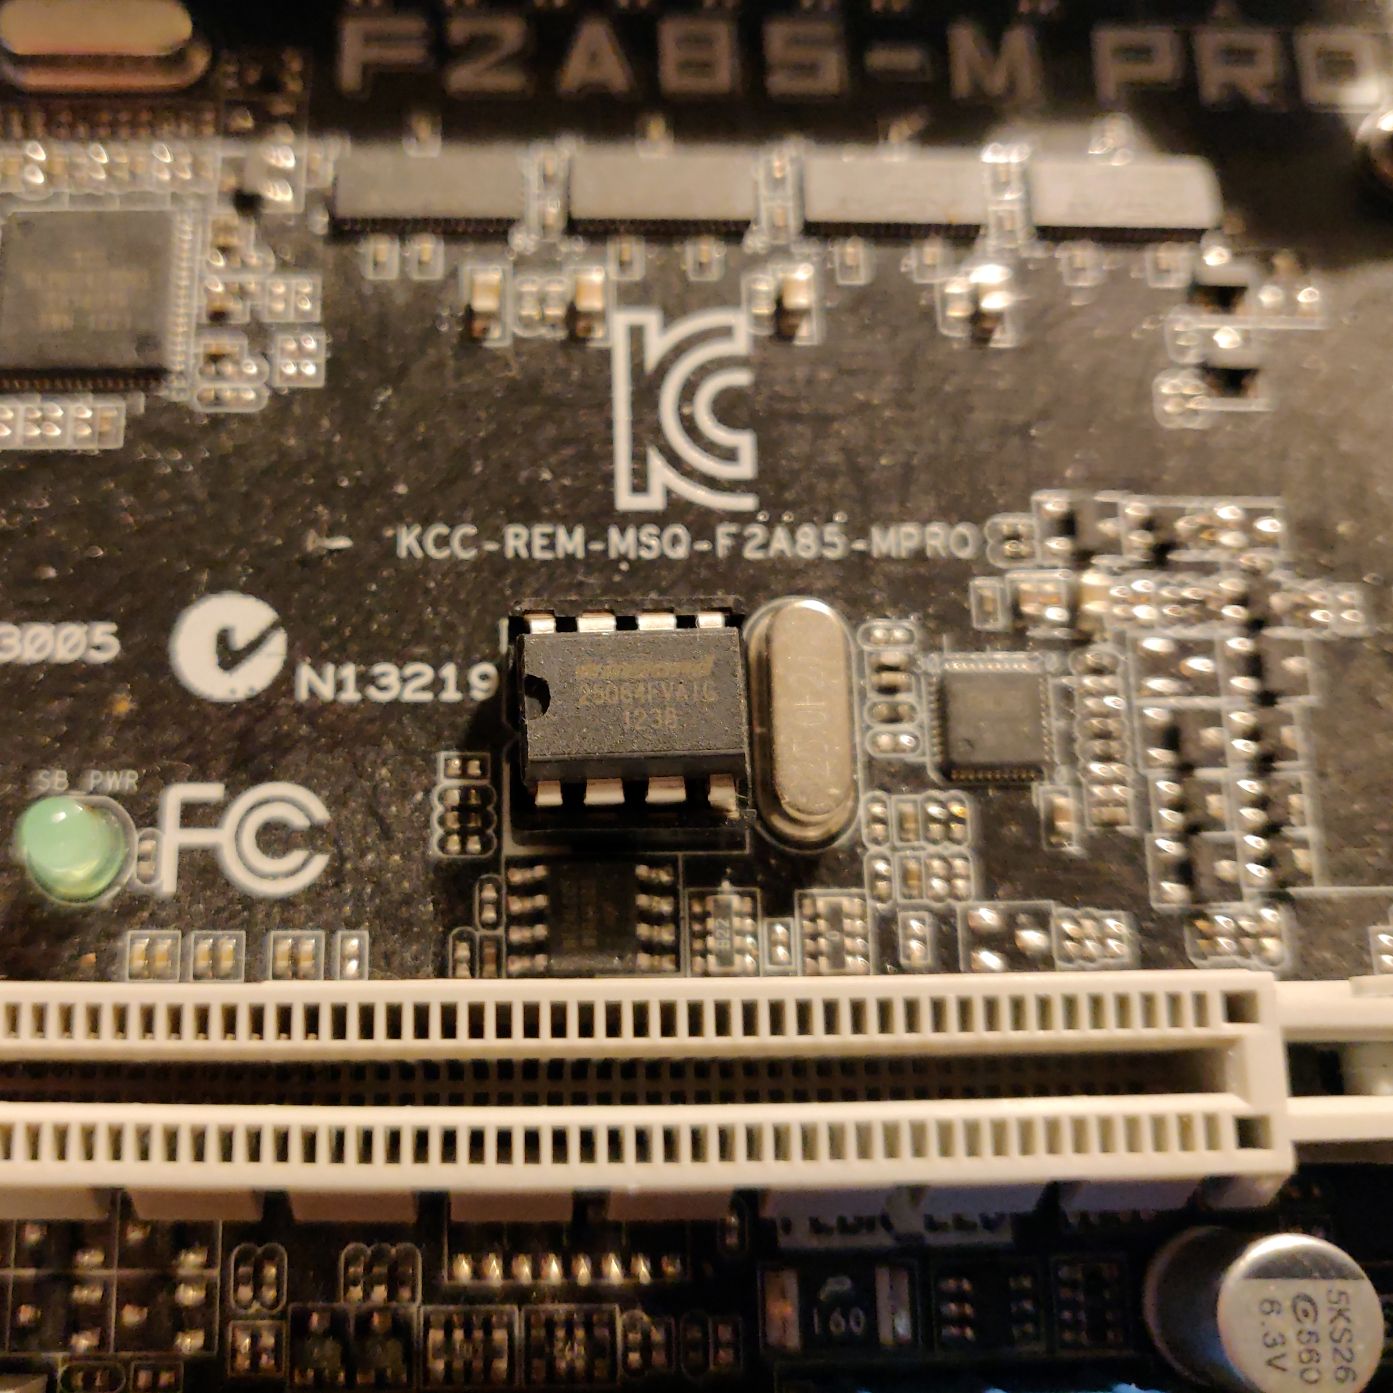
I recommend strongly to buy a separate Winbond W25Q64FVAIG or W25Q64BVAIG spare chip in order to flash the Coreboot build onto it. There are people who flash the onboard chip during a running system but this process can fail and in my opinion it’s better to have a fallback – just in case flashing or extraction have failed.10
total cost, approx.295

4. Assembling your computer

I assume you know how to assemble a computer so now it’s a good time to do so. Make sure your DDR3 RAM is placed into the BLUE SLOTS. Otherwise your computer won’t boot up.

5. Extracting the VGA BIOS binary blob

Unfortunately the internal GPU won’t work unless we integrate its binary into the Coreboot ROM.

You can download now the vgabios.zip which contains the vgabios.bin which I have extracted already from an AMD A10-5800K. Or you download it on your own following the Coreboot guide:

Boot up a linux live Distro like Ubuntu from your prepared pendrive.

Check the ID by issueing “lspci -tvnn”. As you can see my ID of the GPU is 1002:9901. Write the ID down. We will need it later to build the Coreboot ROM.

lspci -tvnn
-[0000:00]-+-00.0 Advanced Micro Devices, Inc. [AMD] Family 15h (Models 10h-1fh) Processor Root Complex [1022:1410]
           +-00.2 Advanced Micro Devices, Inc. [AMD] Family 15h (Models 10h-1fh) I/O Memory Management Unit [1022:1419]
           +-01.0 Advanced Micro Devices, Inc. [AMD/ATI] Trinity [Radeon HD 7660D] [1002:9901]
           +-01.1 Advanced Micro Devices, Inc. [AMD/ATI] Trinity HDMI Audio Controller [1002:9902]
...

For enabling to read the ROM we need to set a enablement bit 1 to the corresponding address 0000:00:01.0 which we found above:

echo 1 > /sys/devices/pci0000:00/0000:00:01.0/rom

Now we can extract the VGA BIOS into a binary. Copy the vgabios.bin file onto a pendrive.

cp /sys/devices/pci0000:00/0000:00:01.0/rom vgabios.bin

6. Building the Coreboot ROM

If you want to skip this step or encounter unsolvable errors prohibiting you to generate the ROM you can download one of my compiled ROMs:

Since the old method isn’t working anymore you can decide now if you want to prepare Ubuntu Linux on your own or want to download my already prepared Virtual Machine I prepared for you.

6a. Preparing Ubuntu 20.04 LTS for building Coreboot

Get yourself a fresh copy of Ubuntu 20.04 LTS. Supply your Ubuntu with needed packages:

sudo apt-get install git build-essential gnat flex bison libncurses5-dev wget zlib1g-dev python

Let’s clone the Coreboot repository and change into that folder:

git clone https://review.coreboot.org/coreboot
cd coreboot

Now copy your vgabios.bin from chapter 5 into the root directory of your Coreboot folder. Alternatively you can use my extracted vgabios.bin from a 5800K:

wget https:/freundschafter.com/download/coreboot/vgabios.bin

Now you can set up the Coreboot environment for building the Coreboot ROM, which we’ll transfer to our BIOS chip.

6b. Setup your settings for the Coreboot build

Run the configuration wizard with:

make nconfig

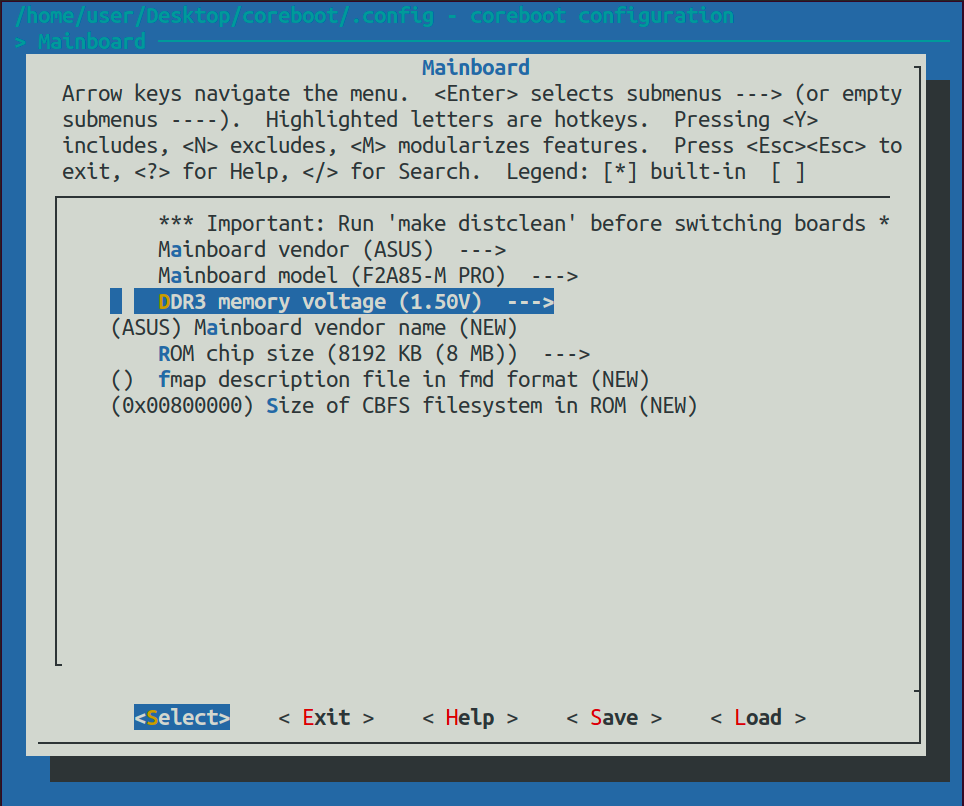
Set up the following parameters:

  • Submenu Mainboard: Choose ASUS as vendor.
  • Submenu Mainboard: Choose F2A85-M or F2A85-M PRO as model.
  • Submenu Mainboard: Choose the DDR3 memory voltage. Refer to your vendor’s website if you are unsure. Possible values are 1.35 / 1.5 / 1.65 V. Some tester said 1.5 V is the failsafe value if you can’t figure it out.
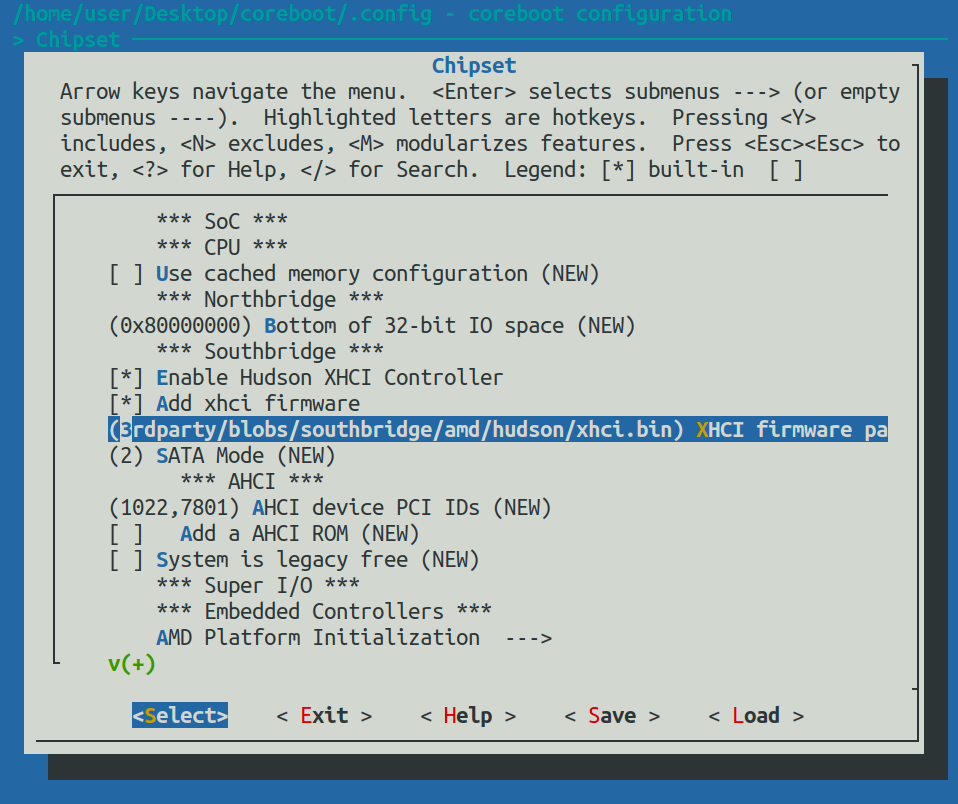
  • Submenu Chipset: Enable Hudson XHCI Controller
  • Submenu Chipset: Add XHCI firmware. The default path is already set correctly.
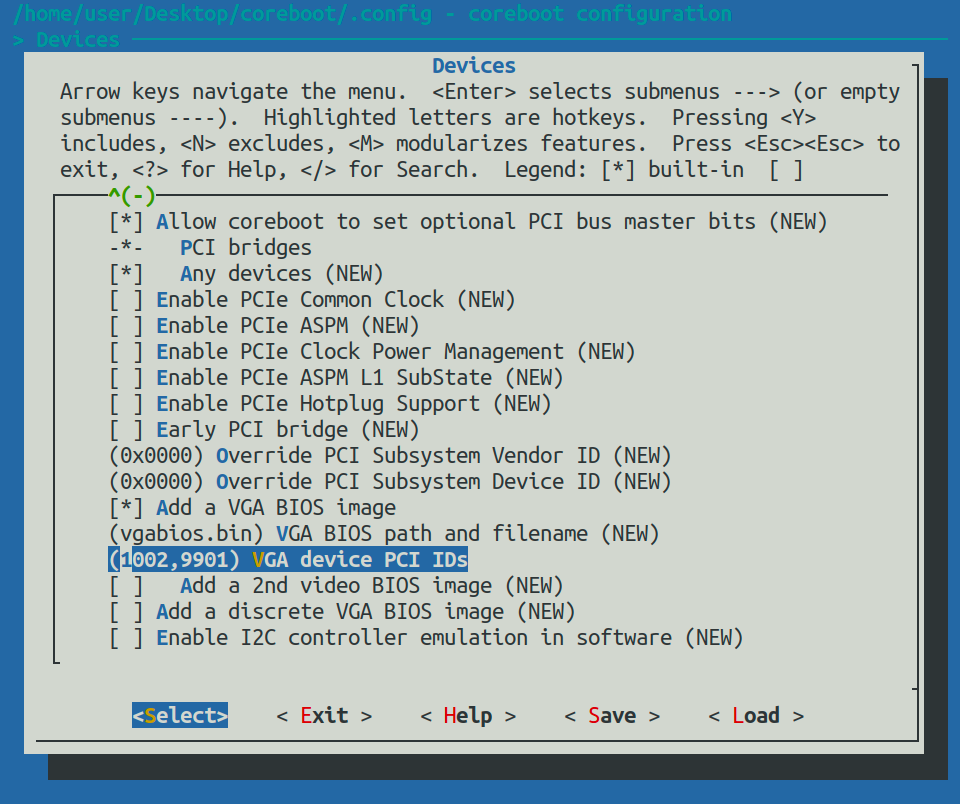
  • Submenu Devices: Add your VGA BIOS image (your extracted one, or mine) and make sure the PCI ID is matching yours by typing in the right values. For our CPU 5800K the value is always the same: 1002,9901.

Save your configuration by hitting “Save”, leave the filename “.config” and exit the tool.

Build the Compiler. CPUS=4 means it will use 4 cores to compile. Adjust this value to meet your number of cores. Be patient, this process takes some time. With my older notebook I had to wait around 10-20 minutes.

make crossgcc-i386 CPUS=4

Finally we are able to build the Coreboot ROM:

make

You will find the generated coreboot.rom in a subfolder called build.

7. Flashing the Coreboot ROM

  • Place your spare chip on the USB programmer and plug it into a USB port on your Linux machine.
  • Install flashrom under Ubuntu by
sudo apt-get install flashrom

Flash your spare chip now with your generated coreboot.rom:

sudo flashrom -n -w build/coreboot.rom --programmer ch341a_spi

If you get the following notifications your chip is ready:

Found Winbond flash chip "W25Q64.V" (8192 kB, SPI).
Erase/write done.
Verifying flash... VERIFIED.

Replace your old BIOS chip by the new flashed one during your system is switched off. Be careful not to bend a pin. So-called DIP8 pliers might help you to release the chip from the board.

Just in case you mess something up you can download a fresh vendor’s copy of the original BIOS/UEFI image and flash it again:

8. Operating System

Now, equipped with Coreboot, you can choose to install any operating system you wish. Since I am very familiar with it I’d go with something Debian-based: PureOS. If you want to follow me, you’ll notice that after installation of PureOS 9.x your screen will remain black due to the lack of AMD graphics firmware packages within PureOS. (Actually it’s a good sign because now you see that binary blobs like the AMD firmware really weren’t loaded during bootup). To fix this we need to install a package into our PureOS installation:

8a. Prepare the pendrive

Get a pendrive formatted with FAT and use another computer to prepare it. Download the firmware.zip archive from https://cdimage.debian.org/cdimage/unofficial/non-free/firmware/testing/current/ and extract firmware-amd-graphics*.deb from it. If you use Linux you can use the following lines:

wget https://cdimage.debian.org/cdimage/unofficial/non-free/firmware/testing/current/firmware.zip
unzip firmware.zip firmware-amd-graphics*.deb

Copy this .deb package into your pendrive, unmount it and plug it into your secure computer system.

8b. Installing the AMD graphics firmware

First login into the system on another TTY by pressing Crtl + Alt + F3 by providing your user and password. Afterwards we will create a new folder as mounting point for your pendrive, mount it, and install the .deb package. You will need the identifier for your pendrive partition. You can find it out by using “lsblk” for instance. In my case it’s /dev/sdb1.

sudo mkdir /pendrive
sudo mount /dev/sbd1 /pendrive
cd /pendrive
sudo apt install ./fireware-amd-graphics*.deb
cd /
sudo umount /dev/sdb1

After having installed the graphics firmware you can now unplug your pendrive, reboot your system by issuing “reboot” and enjoy PureOS welcoming you.
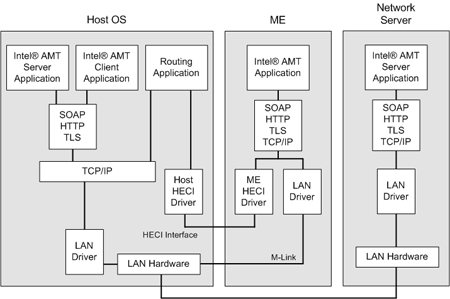
How to set up Postfix on Debian to use a mailhoster with SMTP

Tags: Postfix, Mailhoster, Linux, SMTP
Last update: Jul 2022

Tested with: Debian 10.

Note: Seems to stop working on Debian 11.

First we need to install packages:

sudo apt-get install postfix libsasl2-modules sasl2-bin libsasl2-2

If it’s not opening up automatically you can configure Postfix with “sudo dpkg-reconfigure postfix”.
Confige Postfix by choosing:

  • satellite system
  • system mail name = your-computername
  • smtp relay host = [your-mailhost]:port
  • root mail recipient = empty
  • other destinations = leave default
  • yes
  • local networds = leave default
  • procmail = yes
  • mailbox size limit = 0
  • local address extension = +
  • internet protocols to use = all

Edit Postfix config file:

sudo nano /etc/postfix/main.cf

and add the following:

smtp_sasl_auth_enable = yes
smtp_sasl_security_options = noplaintext noanonymous
smtp_sasl_password_maps = hash:/etc/postfix/sasl_password
smtp_tls_wrappermode = yes
smtp_tls_security_level = encrypt
smtp_tls_CAfile = /etc/ssl/certs/ca-certificates.crt
sender_canonical_maps = hash:/etc/postfix/sender_canonical

In the end your main.cf should look like:

# See /usr/share/postfix/main.cf.dist for a commented, more complete version
myhostname=hostname.your.domain
smtpd_banner = $myhostname ESMTP $mail_name (Debian/GNU)
biff = no

# appending .domain is the MUA's job.
append_dot_mydomain = no

# Uncomment the next line to generate "delayed mail" warnings
#delay_warning_time = 4h

alias_maps = hash:/etc/aliases
alias_database = hash:/etc/aliases
mydestination = hostname.your.domain, localhost.your.domain, localhost
relayhost = [your-mailhost.com]:465
mynetworks = 127.0.0.0/8
inet_interfaces = loopback-only
recipient_delimiter = +
compatibility_level = 2
mailbox_command = procmail -a "$EXTENSION"
mailbox_size_limit = 0
inet_protocols = all

# custom settings for using a mailhoster
smtp_sasl_auth_enable = yes
smtp_sasl_security_options = noplaintext noanonymous
smtp_sasl_password_maps = hash:/etc/postfix/sasl_password
smtp_tls_wrappermode = yes
smtp_tls_security_level = encrypt
smtp_tls_CAfile = /etc/ssl/certs/ca-certificates.crt
sender_canonical_maps = hash:/etc/postfix/sender_canonical

Providing authentication details by editing this file:

sudo nano /etc/postfix/sasl_password

and adding:

[yourmailhost.com]:465 username:password

Secure the file and generate a database for it:

sudo chmod 600 /etc/postfix/sasl_password
sudo postmap hash:/etc/postfix/sasl_password

Let’s create a file to specify our sender addresses:

sudo nano /etc/postfix/sender_canonical

Fill it with all users who will be sending mails:

root yourmail@host.com
anotheruser yourmail@host.com

And process it:

sudo postmap /etc/postfix/sender_canonical

Restart Postfix and send yourself a test mail:

sudo service postfix restart
echo "test" | mailx -s "test" destination@mail.com

You can also send a mail with attachment using mpack:

mpack -d yourmessagebody.txt -s "subject" file destination@mail.com

Troubleshooting

In case something goes wrong you might find these command helpful:

# show the mail log and follow
tail -f /var/log/mail.log

# list all mails which are in the queue
postqueue -p

# flush all mails
postsuper -d ALL

Sources

  • https://wiki.ubuntuusers.de/Postfix/
  • https://www.caretech.io/2018/10/06/how-to-use-proxmox-mail-gateway-with-an-authenticated-smarthost/
  • https://www.ratatouille90.com/2019/07/configure-postfix-with-gmail-and-google-apps-on-debian-or-ubuntu/
  • https://forum.proxmox.com/threads/proxmox-setup-for-gmail.13405/
  • https://tecadmin.net/flush-postfix-mail-queue/
  • https://ashraflinux.wordpress.com/useful-postfix-commands-to-troubleshooting-postfix-issue/

Change history

  • Dec 2018: initial post based on raspbian
  • Feb 2021: adding packages and fixing various mailhost settings
  • Jul 2022: adding note; doesn’t work on Debian 11

How to create and open an encrypted Ubuntu Linux 18.04 server with Dropbear through SSH

Tags: Full Disk Encryption, Ubuntu Linux, Dropbear, SSH
Last update: Dec 2019

Some of you are security-aware and would like to install a full disk encryption on a new system. But you’ll face a problem: Once the machine reboots and you’re not around to type in the password, the machine will simply not boot up. For come over that issue you can use a small SSH listener called Dropbear which loads up during the very beginning of the boot process. Only if you authenticate with your correct RSA key, you can log on to the machine, provide the password for uncrypting the filesystem and will be kicked out again while the machine will finish its bootup.

Prerequisites:
– Freshly installed and encrypted Ubuntu 18.04 server (headless installation – no GUI).
– You should know how to use the linux terminal and the text editor nano.
– I advice you to tell your DHCP router to provide always the same IP to the machine. Otherwise the IP will change/increment every time you boot it up.

Steps:
1. Let’s ensure we have all updates installed:

sudo apt update
sudo apt dist-upgrade

Install the required additional dropbear package:

sudo apt-get --assume-yes install dropbear-initramfs

You’ll notice that during package installation some keys will be automatically generated:
– DSA 1024 key for root
– RSA 2048 key for root
– ECDSA521 key for root

2. Edit the config file:

sudo nano /etc/dropbear-initramfs/config

Uncomment the DROPBEAR_OPTIONS line and add a second port where SSH should listen on:

DROPBEAR_OPTIONS=“-p YOUR_PORT“

3. Since only public key authentication is allowed we need to create and fill up our authorized_keys file:

sudo nano /etc/dropbear-initramfs/authorized_keys

Fill it with the only allowed command and append your ssh-rsa key:

command="/bin/cryptroot-unlock" ssh-rsa YOUR_KEY

4. Apply the changes and reboot:

sudo update-initramfs -u
sudo reboot

5. Now you can login to your machine for instance with:

ssh root@MACHINE_IP -p YOUR_PORT -i ~/.ssh/YOUR_KEY_FILE

Credits:
– https://hamy.io/post/0009/how-to-install-luks-encrypted-ubuntu-18.04.x-server-and-enable-remote-unlocking/
– https://www.pbworks.net/ubuntu-guide-dropbear-ssh-server-to-unlock-luks-encrypted-pc/
– https://seeseekey.net/archive/122144/ (Hetzner specific)

About Intel Management Engine (Intel ME) & Intel Active Management Technlogy (iAMT)

Tags: intel me, intel amt
Last update: Jun 2018

Technological overview

The Intel Management Engine (Intel ME) is a standalone microcontroller component which operates independent from your computer’s hardware. It provides an interface between operating system, hardware and BIOS. The Intel ME subsystem is hosting the firmware of Intel Active Management Technology (iAMT). Intel ME and iAMT has been developed for so called out-of-band managebility: remote administration of computer systems.

Figure: Intel ME within the chipset

The Management Engine (yellow) has a separated connetion to the internal Interconnect; allowing the Intel ME core processor (RISC core) to bypass other subsystems like TPM and SMBus. To bypass every piece of software running on your computer you can think of. (Source #02)

Figure 2: chipset connected with the network interfaces

The Intel AMT is stored in a flash memory and protected against unauthorized access. On PC’s power-up the firmware is going to be uploaded into the RAM. Afterwards Intel ME executes this uploaded (iAMT) firmware and those allows the CPU to reset in order to initiate the whole boot process and to load the operating systems kernel etc.

Figure 3: connection paths

The Intel ME is directly connected to the LAN hardware through a builtin driver. This allows the ME to communicate secretly via LAN, WLAN and mobile networks while bypassing the operating system (Source #08). Until now there has been no discovery of suspicious network packets which does not necessarily mean that it could not.

Short conclusion

In other words: Your computer is running Intel ME all the time. Invisible. Even if the PC is powered off.

Is there a problem?

People who are keen on security and try to avoid risks are noticing it immediately: If there is an underlying second operating system – do we have control over it? How secure is this at all? Is there a way to disable Intel ME and Intel AMT?

To Answer those questions we need to check out if there is a sufficient documentation out there which allows to comprehend all mechanisms and we need to watch out for possible security flaws.

Documentation

There is an Intel AMT Implementation and Reference Guide out there. It describes the Intel AMT features and how to use the SDK. There is a short passage about how to enable or disable the “Intel AMT Network”. At least some OEM vendors allow to disable iAMT in the BIOS settings (source #04).

Figure 4: BIOS AMT setting on a ThinkPad notebook

The Intel ME BIOS Extension can be accessed through CTRL+P during bootup. The default password is “admin”. There is a User Guide for the Intel ME BIOS Extension but there is no option for disabling Intel ME – just changing some parameters and configuring the iAMT.

That means the status of the underlying Intel ME can’t be changed. There is no source code availabe and according Intel will never be. Usually there are two reasons for that: The code is entirely kept secret due to the ownership of intellectual property – or the code doesn’t belong to Intel at all. In fact scientists found out recently, that the Intel ME firmware seems to be based on Andrew S. Tanenbaum’s Minix (source #06), which has been released under BSD license.

So as far as we know the Intel ME can’t be disabled at all. In addition there is no documentation available. We can draw the conclustion that nobody knows how this subsystem operates. As a matter of fact we have no control over it and are not able to influence its behaviour. In cybersecurity terms such a thing is called a blackbox and there is only one way to find out more about it: investigative testing.

Security vulnerabilities and exploits

Please refer to a list of known vulnerabilities to get a more detailed picture about Intel ME’s security. Just to mention some of them:

  • Ring-3 rootkit
  • Zero-touch provisioning
  • SA-00075/ Silent Bob is Silent
  • PLATINUM
  • SA-00086

This management engine is definitely running. The lack of an ordinary documentation leads inevitable to security holes which represent a not only potentional but and proven risk to data and computer security.

What is affected?

The Intel ME is integrated into all intel desktop, mobile and server systems since June 2006. It has been launched with the “Intel 965 Express Family” and the “ICH8 I/O Controller Family” (source #09).

Is there a solution?

Vendor updates

There is no known method to fix vulnerabilities except updating the Intel ME firmware by the vendor/oem. However, an attacker with access to the ME firmware is still able to flash an old vulnerable version in order to use an exploit.

Trying to deactivate Intel ME

Russian researchers analyzed Intel ME v11 and discovered a special operations mode called High Assurance Platform (HAP). Once this bit is set it disables some parts of the engine in an early state. Unfortunately it’s not possible to disable or erase all parts of Intel ME since some part of the ME firmware is checking Intel’s signatures, which are hardcoded within the hardware. Only if this check completes successfully the hardware is allowed to boot up. There is a software called ME Cleaner to get rid of some parts of the Intel ME firmware.

Buying current hardware with Intel ME (probably) disabled

The following vendors are currently providing almost “clean” hardware. It’s unknown and unsure if the Intel ME is really deactivated.

  • Purism sells security and privacy focused hardware while using ME Cleaner
  • Dell ships “Latitude 14 Rugged” notebooks on custom order with “No Out-of-Band Management”

Buying old hardware where Intel ME hasn’t been implemented yet

The much better option is to use a device which has no Intel ME at all. Please refer to CPU and system alternatives without Intel ME iAMT and AMD PSP / Secure Technology.

Sources

About AMD TrustZone, AMD Platform Security Processor (PSP), AMD Secure Technology

Tags: amd trustzone, amd psp, amd secure technology
Last update: jun 2018

Technological overview

ARM, originally Acorn RISC Machine, is a set of architectures for computer processors. In 2004 ARM developed TrustZone – an optional extension for processors which provide a secure execution environment (source 01). In 2012 AMD announced the integration of ARM’s TrustZone into their first Accelerated Processing Units (APU). Similar to the integration of the Intel Management Engine (link) those extension is also placed close to the CPU (source 02). This implementation has been renamed to the “AMD Platform Security Processor” (PSP) (source 03).

The PSP is called “dedicated security subsystem integrated within APU”. It provides an Trusted Exection Environment, Secure Boot, Cryptographic acceleration and TPM functionality. The hardware characteristics are as follows:

  • dedicated 32bit microcontroller (ARM with TrustZone technology)
  • isolated ROM & SRAM on the CPU
  • access to the memory and resources of the computer system
  • secure storage for firmware and data
  • special cryptographic processor
  • implementation of
    • RSA 1024, 2048, 4096 bit
    • SHA, SHA-224, SHA256
    • ECC
    • AES engine (ECB, CBC, CFB, OFB, CTR, CMAC, XTS-AES128)

In the end PSP’s functionality is pretty similar to Intel’s ME. Allowing 3rd parties to completely enforce policies, monitor integrity and manage audit & assets.

This subsystem operates with a licensed Trustonic TEE security kernel.

Interim conclusion

The computer is running AMD Secure Technology all the time. Invisible. Even if the PC is powered off. But wait, is that a problem? People who are keen on security and try to avoid risks are noticing it immediately: If there is an underlying second operating system – do we have control over it? How secure is this at all? Is there a way to disable AMD PSP / AMD Secure Technology?

Documentation

To Answer those questions we need to check out if there is a sufficient documentation out there which allows to comprehend all mechanisms and we need to watch out for possible security flaws.

AMD PSP / AMD Secure Technology has been mentioned in chapter 2.14 of the BIOS and Kernel Developer’s Guide for AMD Familiy 16h Models 30h-3Fh for the first time. On page 156 you can find just a very brief summary of this technology.

Neither is there a hint how to disable those functionality in total or in parts, nor is the source code availabe to the public.

So as far as we know AMD PSP / AMD Secure Technology can’t be disabled at all. The AMD Secure Technology is integrated into all intel desktop, mobile and server systems since 2014.

Security vulnerabilities and exploits

Also in AMD PSP vulnerabilities have been found. It was possible to craft a certificate to get code execution rights on the AMD Secure Processor and to infiltrate AMD’s security subsystem (source 04).

This management engine is definitely running. The lack of an ordinary documentation leads inevitable to security holes which represent a not only potentional but and proven risk to data and computer security.

Is there a solution to this?

  • Vendor updates: There is no known method to fix vulnerabilities except updating the AMD Secure Technlology firmware by the vendor/oem.
  • Trying to deactivate AMD Secure Technology: Some vendors like Asrock and Gigabyte have implemented a switch called “BIOS PSP Support” into their UEFI BIOS. Unfortunately there is no description what this switch acutally does.
  • Buying hardware without this technology: Please refer to CPU and system alternatives without Intel ME iAMT and AMD PSP / Secure Technology.

Sources

Open and secure computing

Tags: open source, firmware, blob, coreboot, libreboot
Last Update: Nov 2018

Introduction

When you think about computers there are always two levels which are coexistent: hard- and software. Every software is running on top of hardware. Despite the probability that open and free software might be better (refer to comparison between open and closed source) there are free and open-sourced solutions for both levels.

Pinetree

To minimize security risks you should examine your whole chain of computing. Figure 1 provides a short overview about hard- and software you might look for if you are keen on following the „libre“-philosophy.

Figure: pinetree of open computing

A brief explanation: hardware / firmware

At the very bottom your computer is running a basic BIOS/UEFI which has been implemented by your OEM (original equipment manufacturer). This piece of software is called firmware and it provides control for your specific hardware parts which your computer consists of.

This BIOS (Basic Input/Output System) is proprietary firmware which is located on a special ROM chip. It is run after you switch your computer on. If you are interested in using free software you should think about replacing that firmware first. Unfortunately that’s almost impossible for most of the mainboards out there. It’s not possible because the source code of this firmware is never available to anybody except the manufacturer himself. As a replacement you could use an implementation called „Coreboot“ or „Libreboot“. There are some parts of your hardware that simply won’t function without small portions of proprietary code. Due to those limitations there are just very few mainboards which can be run without any parts of proprietary code as Libreboot aims.

Coreboot sacrifices some liberty as it includes a minimal bunch of proprietary code to make the bare minimum work. Because of this inclusion more mainboards are supported and work with Coreboot. If Libreboot is limiting you too much (and yes, there is really just few hardware working), then you should give Coreboot a shot. In the end the configuration tool which Coreboot uses allows you to build your custom Coreboot-image which includes only those parts which you have selected before.

A brief explanation: software / operating system

If you succeed in running your hardware without a proprietary BIOS/UEFI you should consider using a free operating system as well since you can’t be sure what your operating system does if the source code is closed.

What is BIOS?

This is the Basic Input/Output System. It is an (often) proprietary firmware which is located on a special ROM chip. It is run after you switch your computer on.

BIOS’ settings are saved within the CMOS chip on your mainboard.

The BIOS offers configuration options for memory, drives, clock speed, virtualization, power management, security, health services and boot order (amongst others).

What is UEFI?

UEFI Stands for Unified Extensible Firmware Initiative. This is pretty much the same as a BIOS just with nice additional graphics instead of text-based optics, additional Ethernet support and some other extensions. It is also often a proprietary firmware which is located on a special ROM chip (system on a chip) and runs after you switch your computer on.

System alternatives without Intel ME / iAMT and AMD PSP / Secure Technology

Tags: computer system without intel me, amd psp
Last update: Jan 2021

Due to a lack of documentation and possiblities to deactivate these “secure execution environments” those can’t be disabled on our own. If you are interested you can read some more details about Intel ME/iAMT and AMD Platform Secure Processor / AMD Secure Technology. This article is providing an overview about possible solutions. From today’s point of view there a several options and we’ll discuss every of them:

  • Option 1: Getting compatible hardware and flashing Libreboot on your own
  • Option 2: Buying an already flashed device with Libreboot
  • Option 3: Getting compatible hardware and flashing Coreboot on your own
  • Option 4: Buying an already Coreboot-compatible modern Notebook
  • Option 5: Get an opensource SoC / single board computer
  • Mandatory: Use an operating system which is free from proprietary undocumented code

So let’s get started 😉

Option 1: Getting compatible hardware and flashing Libreboot on your own

Libreboot is a free BIOS/UEFI replacement which aims to completely omit any proprietary binary blobs within the firmware. If you are a hardliner and accept only free and blob-free solutions, then you should try to stick to Libreboot first. Unfortunately there is so few rather old compatible hardware, that in most cases you’ll find it insufficient. Please check their website for more details. To make it short: In my opinion the most promising candidates are:

Desktop and Server boards

  • Gigabyte GA-G41M-ES2L desktop board
  • Asus KCMA-D8 server board + AMD Opteron 4200 series CPU
  • Asus KGPE-D16 server board + AMD Opteron 6200 series CPU

Notebooks

  • Lenovo ThinkPad X60 / X60s / T60 / T60 Tablet
  • Lenovo ThinkPad X200 / X200s / X200 Tablet / R400 / T400 / T400s / T500 / W500
  • Apple MacBook 2,1

Option 2: Buying an already flashed device with Libreboot

If you don’t want to take the risk of a possibly broken device there are suppliers who are selling some of the above mentioned, just already flashed for you:

Option 3: Getting compatible hardware and flashing Coreboot on your own

Coreboot is a firmware for mainboards where most of the proprietary code has been removed, but not all of it. Especially in quite modern computers there are some (closed and non-free) parts needed, to boot up the computer. All other parts or the system are opensource and can be viewed publicly. Currently as I write those letters there is a bunch of supported mainboards which work with Coreboot. Among the official mainboard-specific documentation list there are for instance:

Mainboards

  • ASRock H81M-HDS (Intel Socket 1150)
  • ASRock H110M-DVS (Intel Socket 1151)
  • Asus F2A85-M (AMD Socket FM2)
  • Asus P5Q (Intel Socket 775)
  • Asus P8H61-M LX (Intel Socket 1155)
  • Asus P8H61-M Pro (Intel Socket 1155)
  • Asus P8Z77-M Pro (Intel Socket 1155)
  • Gigabyte GA-H61M-S2PV (Intel Socket 1155)
  • Intel DG43GT (Intel Socket 775)
  • MSI MS-7707 (Intel Socket 1155)

Systems

  • Dell Optiplex 9010 SFF
  • HP Compaq 8200 Elite SFF
  • HP Z220 Workstation SFF
  • HP EliteBook 2560p
  • HP EliteBook 8760w
  • Purism Librem Mini
  • System76 Lemur Pro

Tutorial available

I have build up my own custom system based on an Asus F2A85-M mainboard together with an AMD A10-5800K APU. If this way is suitable for you, you can follow the tutorial and build up a system on your own. If you are not satisfied with my choice of the processor, you can check out the elaboration on AMD Processors without AMD PSP / Secure Technology.

Option 4: Buying an already Coreboot-compatible modern Notebook

With an awareness of increased security new manufacturers emerge selling specialized notebooks. For instance:

Option 5: Get an open source SoC / single board computer

Alternatively to the classical x86/x64 world there is also the possibility of using an ARM based system on a chip (SoC). Please find some of the common used boards below and feel free to search for new ones. Especially the quite performant boards by Olimex are certified by the Open Source Hardware Association. I recommend to get rid of the trusted execution environment (TEE) by using Crust: a libre firmware for Allwinner SoCs.

Vendor / ModelSoC architectureLinux / FreeBSD?Execution Environment free?Notes
Libre Computer Board
ALL-H3-CC (Tritium)
Allwinner H3
(ARM Cortex A7 or A53)
yes / yesprobably noOnly open schematics available.
Beagle Board BlackSitara AM335
(ARM Cortex A8)
yes / yesyesImplementation of TrustZone is limited by TI to high-volume customers. Documentation available.
OLIMEX Ltd
OLinuXino
Allwinner A20, A64
(ARM Cortex A7 or A53)
yes / yesA20: yes
A64: possible
All A20 and A64 boards are open source hardware. Documentation available.
Table: tiny overview about available SoC computer

Mandatory: Use an operating system which is free from proprietary undocumented code

The openest hardware isn’t good enough if you use an operating system which isn’t free. You might want to have a quick look on the pinetree of open and secure computing to get a short idea about the relevance of open hard- and software. In the following table you’ll find free and available operating systems. Futher operating systems can be found at gnu.org.

NameFree (as in freedom)?Project active?Available ArchNotes
Parabolayesyesx64, i686, ARMv7based on Arch
PureOSyesyesx64based on Debian
Trisquelyesyesx64based on Ubuntu
Urukyesyesx64based on Trisquel/Ubuntu
Guixyesyesx64, i686, ARMv7, AArch64advanced GNU OS
Table: overview about free operating systems

Sources

AMD processors without AMD PSP / Secure Technology

Tags: amd, cpu, apu, psp, secure technology, trusted environment, secure execution environment
Last update: Nov 2020

If we want to find the latest CPU which is not equipped with any secure execution environment, we need to look into the official and other documentations, which are available publicly. From news in the media we assume the secure execution environment to be integrated somewhere around 2013.

Available documents are:

What are we actually looking for? Well, we try to find a gap among the official documents: We watch out for the crucial starting point, when the documentation is mentioning the PSP for the first time. From this point we’ll find out which CPU’s are the first being affected by the PSP subsystem. And secondly we’ll search for the previous CPU generation, which we assume not to be affected.

Step 1: Checking the AGESA documentation (source 1). On AMD systems with BIOS/UEFI the AMD AGESA code is responsible for releasing the CPU from halt state during boot initialisation, allowing it to start up and work properly. This is a binary proprietary firmware blob, which is needed for the machine to work. The AGESA documentation states that the macro called “AMD_RESET_ENABLEMENT” initialise fundamental controls which have to be placed as early as possible in the boot sequence. This marco initialises DRAM through PSP. This is out first occurrence of the word PSP. On page 158 is written that “Family 16h and Family 15h-Models 60h and later contain a PSP but it does not perform the memory initialisation”.
Conclusion: This tells us that Familiy 15h Models 60h and later + Family 16h contain a PSP. Looks like we need to check on previous families!

Step 2: Verifying the AGESA conclusion from step 1. Let’s have a look into the BKDG for those prior mentioned Family 15h Models 60h and later (source 2). In fact we find on page 158 a „device 8“ named „PSP“. So we can confirm the AGESA documentation.
Conclusion: Since both documents match we are quite sure that PSP is implemented. 

Step 3: Checking if PSP elements are also mentioned in the Family 15h before 60h. First we need to find out what „Family 15h“ actually means. A quick research on Wikipedia reveals that AMD’s Family 15h consists of those architectures which carry the following names:

  • Bulldozer (CPUIDs 00h-01h)
  • Piledriver (CPUIDs 02h + 10h-1Fh)
  • Steamroller (CPUIDs 30h-3Fh)
  • Excavator (CPUIDs 60h-6Fh + 70h-7Fh)

Conclusion: The Family 15h before 60h is the Steamroller architecture with the CPUIDs numbered 30h-3Fh.

Step 4: Checking the documentation for Steamroller for anything PSP-like. The corresponding BKDG (source 3) doesn’t mention anything PSP related. It’s also not mentioned within the root complex topology on page 148. But unfortunately this is not true for the Product Data Sheet (source 4). AMD states on page 6: „Platform Security Processor“. Bummer! Which documentation should we trust now? The BKDB is from Feb 2015 and the Data Sheet is from Jan 2014. So it looks like the PSP has been planned in Jan 2014 but didn’t make it in time into the CPU – as stated in the „final“ BKDB handbook for developers.
Conclusion: There is a high chance no PSP is implemented in 30h-3Fh.

Step 5: Which specific CPUs are meant? If we check the Revision Guide for Family 15h Models 30h (source 5) we see on page 9 that the following products with the stepping KV-A1 are meant:

  • AMD Elite Performance A-Series APU with Radeon Graphics
  • AMD R-Series Mobile Accelerated Processing Unit (APU) with AMD Radeon HD Graphics
  • AMD Opteron X1200 Series Processor
  • AMD Opteron X2200 Series APU Processor

The Steamroller-Family incorporates the CPUs code-named by Kaveri. You could also use the Piledriver architecture with its code-names Trinity and Richland since they are prior to Steamroller.

Wikipedia shows us nice lists of usable CPUs/APUs. I have sorted them by performance. The later, the better.

Steamroller/Kaveri (Desktop APUs)
Athlon X2 450 (2x 3,5 Ghz, 65W)
Athlon X4 840 (4x 3,1 Ghz, 65W)
Athlon X4 860K (4x 3,7 Ghz, 95W)
Athlon X4 870K (4x 3,9 Ghz, 95W)
Athlon X4 880K (4x 4,0 Ghz, 95W)
FX-770K (4x 3,5 Ghz, 65W)
A4 PRO-7350B (2x 3,4 Ghz, 65W)
PRO A4-8350B (2x 3,5 Ghz, 65W)
A6-7400K (2x 3,5 Ghz, 65W)
A6 PRO-7400B (2x 3,5 Ghz, 65W)
A6-7470K (2x 3,7 Ghz, 65W)
PRO A6-8550B (2x 3,7 Ghz, 65W)
A8-7500 (4x 3,0 Ghz, 65W)
A8-7600 (4x 3,1 Ghz, 65W)
A8 PRO-7600B (4x 3,1 Ghz, 65W)
A8-7650K (4x 3,3 Ghz, 95W)
A8-7670K (4x 3,6 Ghz, 95W)
PRO A8-8650B (4x 3,2 Ghz, 65W)
A10-7700K (4x 3,4 Ghz, 95W)
A10-7800 (4x 3,5 Ghz, 65W)
A10 PRO-7800B (4x 3,5 Ghz, 65W)
A10-7850K (4x 3,7 Ghz, 95W)
A10 PRO-7850B (4x 3,7 Ghz, 95W)
A10-7860K (4x 3,6 Ghz, 65W)
A10-7870K (4x 3,9 Ghz, 95W)
A10-7890K (4x 4,1 Ghz, 95W)
PRO A10-8750B (4x 3,6 Ghz, 65W)
PRO A10-8850B (4x 3,9 Ghz, 95W)

Piledriver/Richland+Trinity (Desktop APUs)
A4-4000 (2x 3,0 Ghz, 65W)
A4-5300 (2x 3,4 Ghz, 65W)
A6-5400K (2x 3,6 Ghz, 65W)
A6-6400K (2x 3,9 Ghz, 65W)
A8-5500 (4x 3,2 Ghz, 65W)
A8-5600K (4x 3,6 Ghz, 100W)
A8-6500T (4x 2,1 Ghz, 45W)
A8-6500 (4x 3,5 Ghz, 65W)
A8-6600K (4x 3,9 Ghz, 100W)
A10-5700 (4x 3,4 Ghz, 65W)
A10-5800K (4x 3,8 Ghz, 100W)
A10-6700 (4x 3,7 Ghz, 65W)
A10-6800K (4x 4,1 Ghz, 100W)

Piledriver/Richland+Trinity (Desktop CPUs)
FX-4300 (2x 3,8 Ghz, 95W)
FX-4320 (2x 4,0 Ghz, 95W)
FX-4350 (2x 4,2 Ghz, 125W)
FX-6300 (3x 3,5 Ghz, 95W)
FX-6350 (3x 3,6 Ghz, 95W)
FX-8300 (4x 3,3 Ghz, 95W)
FX-8310 (4x 3,4 Ghz, 95W)
FX-8320E (4x 3,2 Ghz, 95W)
FX-8320 (4x 3,5 Ghz, 125W)
FX-8350 (4x 4,0 Ghz, 125W)
FX-8370E (4x 3,3 Ghz, 95W)
FX-8370 (4x 4,4 Ghz, 125W)
FX-9370 (4x 4,4 Ghz, 220W)
FX-9590 (4x 4,7 Ghz, 220W)

Piledriver based Opterons (Server)
Delhi 32nm
Opteron 3320 EE (4x 1,9 Ghz, 25W)
Opteron 2250 HE (4x 2,8 Ghz, 45W)
Opteron 3365 (8x 2,3 Ghz, 65W)
Opteron 3380 (8x 2,6 Ghz, 65W)

Seoul 32nm
Opteron 43CX EE (4x 2,2 Ghz, 35W)
Opteron 4310 EE (4x 3,0 Ghz, 35W)
Opteron 4334 (6x 3,1 Ghz, 95W)
Opteron 4340 (6x 3,5 Ghz, 95W)
Opteron 4332 HE (6x 3,0 Ghz, 65W)
Opteron 4386 (8x 3,1 Ghz, 95W)
Opteron 4365 EE (8x 2,0 Ghz, 40W)
Opteron 43GK HE (8x 2,6 Ghz, 65W)
Opteron 4376 HE (8x 2,6 Ghz, 65W)

Abu Dhabi 32nm
Opteron 6308 (4x 3,5 Ghz, 115W)
Opteron 6320 (8x 2,8 Ghz, 115W)
Opteron 6328 (8x 3,2 Ghz, 115W)
Opteron 6338P (12x 2,3 Ghz, 99W)
Opteron 6344 (12x 2,6 Ghz, 115W)
Opteron 6348 (12x 2,8 Ghz, 115W)
Opteron 6370P (16x 2,0 Ghz, 99W)
Opteron 6376 (16x 2,3 Ghz, 115W)
Opteron 6378 (16x 2,4 Ghz, 115W)
Opteron 6380 (16x 2,5 Ghz, 115W)
Opteron 6386 SE (16x 2,8 Ghz, 140W)
Opteron 6366 HE (16x 1,8 Ghz, 85W)

Bulldozer based Opterons (Server)
Zurich 32nm
Opteron 3250 HE (4x 2,5 Ghz, 45W)
Opteron 3260 HE (4x 2,7 Ghz, 45W)
Opteron 3280 (8x 2,4 Ghz, 65W)

Valencia 32nm
Opteron 42DX EE (4x 2,2 Ghz, 40W)
Opteron 4226 (6x 2,7 Ghz, 95W)
Opteron 4234 (6x 3,1 Ghz, 95W)
Opteron 4238 (6x 3,3 Ghz, 95W)
Opteron 4240 (6x 3,4 Ghz, 95W)
Opteron 4228 HE (6x 2,8 Ghz, 65W)
Opteron 4230 HE (6x 2,9 Ghz, 65W)
Opteron 4280 (8x 2,8 Ghz, 95W)
Opteron 4284 (8x 3,0 Ghz, 95W)
Opteron 42MX HE (8x 2,2 Ghz, 65W)
Opteron 4274 HE (8x 2,5 Ghz, 65W)
Opteron 4276 HE (8x 2,6 Ghz, 65W)
Opteron 4256 EE (8x 1,6 Ghz, 35W)

Interlagos 32nm
Opteron 6204 (4x 3,3 Ghz, 115W)
Opteron 6212 (8x 2,6 Ghz, 115W)
Opteron 6220 (8x 3,0 Ghz, 115W)
Opteron 6234 (12x 2,4 Ghz, 115W)
Opteron 6238 (12x 2,6 Ghz, 115W)
Opteron 6230 HE (12x 2,2 Ghz, 85W)
Opteron 6272 (16x 2,1 Ghz, 115W)
Opteron 6274 (16x 2,2 Ghz, 115W)
Opteron 6275 (16x 2,2 Ghz, 115W)
Opteron 6276 (16x 2,3 Ghz, 115W)
Opteron 6278 (16x 2,4 Ghz, 115W)
Opteron 6282 SE (16x 2,6 Ghz, 140W)
Opteron 6284 SE (16x 2,7 Ghz, 140W)
Opteron 6287 SE (16x 2,8 Ghz, 140W)
Opteron 6291 SE (16x 3,0 Ghz, 140W)
Opteron 6262 HE (16x 1,6 Ghz, 85W)

According to this you can also check the huge table of AMD processors on Wikipedia.

Conclusion: You can choose any CPU/APU of the leftmost list to get the „latest“/last CPU without a PSP builtin.

Wie Meltdown funktioniert

Tags: meltdown, intel cpu vulnerability
Last update: Aug 2020

1. Einleitung

Unsere heutigen gewöhnlichen Computersysteme funktionieren nach dem Prinzip der sog. Von-Neumann-Architektur nach welcher es im Computer einen gemeinsamen Speicher gibt, der sowohl Programmbefehle als auch Daten hält. Mit Daten sind unsere gewöhnlichen Nutzdaten gemeint, die wir als Nutzer speichern und verarbeiten. Da sich dies nur in dem für den Nutzer vorgesehenen Bereich des Betriebssystems abspielt, spricht man daher auch von User-Space. Programmbefehle hingehen liegen ausschließlich in der Hoheit des Betriebssystems, da sie das gesamte System steuern. Diesen Bereich nennt man Kernel-Space. Aufgabe eines guten Betriebssystems ist es diese beiden Speicherbereiche perfekt zu isolieren. Ein gewöhnlicher Benutzer sollte im Rechnerbetrieb niemals Zugriff auf Daten erlangen, die eigentümlich nur der Rechnersteuerung dienen. Das mag erstmal etwas unbedeutend klingen, aber sobald wir uns vorstellen, dass auf heutigen Betriebssystemen mehrere Benutzer oder Kunden gleichzeitig angemeldet sein können, wird das Problem offenbar: Der Kern des Betriebssystems (Kernel) speichert in seinem eigenen isolierten Speicherbereich (Kernel-Space) nicht nur potentiell sensitive Daten von uns als angemeldetem Benutzer, sondern auch von allen anderen Benutzern, die angemeldet sind. Wenn wir nun in der Lage wären den ganzen Kernel-Space auszulesen, dann würden uns sämtliche Informationen in die Hände fallen, die das Betriebssystem mit allen Mitteln der Isolation zu schützen versucht.

2. Problem

Mit der Meltdown genannten Technik ist es aber als Benutzer möglich den Speicherbereich des Kernels über einen Umweg auszulesen! Weil dieses Auslesen nicht direkt geschieht, sondern über einen Umweg realisiert wird, nennt man dies eine sog. Seitenkanal-Attacke. Diese Seitenkanal-Attacke wird erst durch die sog. Out of Order Execution und spekulative Ausführung ermöglicht.

3. Out of Order Execution und spekulative Ausführung

Moderne Prozessoren versuchen aus Gründen aus Auslastung und Performance so viele Befehle wie möglich auszuführen. Man muss sich das derart vorstellen, dass ein Prozessor die Programmbefehle nicht linear hintereinander bekommt und ausführt, sondern die Befehle in einem Bündel vom Betriebssystem erhält und dann „so gut es ihm gefällt“ sortiert. Es kann Befehle geben die sich für den Prozessor „gut“ sortieren lassen, weil sie sich unabhängig voneinander verarbeiten lassen wie beispielsweise:

a = 1 + 3;
b = 2 + 4;

Und es kann Befehle geben, die sich gegenseitig bedingen:

a = 1 + 3;
b = a + 4;

Hier muss der Prozessor auf die komplette Abarbeitung der ersten Zeile warten, weil die berechnete Variable a für die zweite Zeile benötigt wird.

Wir sehen also, dass der Prozessor die anstehenden Befehle nicht immer linear (In-Order) abarbeitet, sondern aus Gründen der Performance stets versucht unabhängige Befehle parallel (Out-of-Order) auszuführen. Diese Möglichkeit Befehle parallel zu verarbeiten ist die Grundlage dafür, dass der Prozessor sich fragt welche Befehle überhaupt als nächstes parallel ausgeführt werden können. Auf der Suche nach dem nächsten Befehl, welcher zur Abarbeitung geeignet sein könnte, bedient er sich seiner eigenen Vorhersage. Im Grunde versucht der Prozessor den nächsten wahrscheinlichen Befehl zu erraten und spekuliert somit auf dessen nächste Ausführung. Das bedeutet insgesamt, dass der Prozessor Befehle vorab ausführt, bevor sie eigentlich an der Reihe sind, ohne zu wissen, ob diese überhaupt benötigt sein werden. Daher der Name der spekulativen Ausführung. Das Kalkül für den Prozessor ist relativ einfach: Falls das Ergebnis des Befehls tatsächlich benötigt wird, so ist der Befehl bereits ausgeführt worden und das Ergebnis kann sehr schnell geladen werden. Im anderen Fall müssten die Befehle erst neu sortiert, die dafür nötigen Daten/Ressourcen geholt und der Befehl ausgeführt werden. Dies ist viel aufwändiger und kostet deshalb deutlich mehr Zeit.

Wir merken uns: Wenn wir irgendwie merken könnten, dass bestimmte Ergebnisse besonders schnell geliefert werden können, dann wüssten wir, dass diese vorher bereits abgearbeitet worden sind.

4. Ein konkretes Beispiel

Wir nehmen an wir haben einen gemeinsamen Speicherbereich von 0 bis 15 und davon sind dem Benutzer 0 bis 11 und dem Betriebssystem-Kern 12 bis 15 zugewiesen.

Adresse0123456789101112131415
Inhalt1337
Tabelle: Inhalt des Speicherbereichs

Wir als normaler Benutzer geben in einem Programm den Befehl aus, auf die Position Nr. 12 in diesem Speicherbereich zuzugreifen:

my_precious = read(12);

welcher jedoch zum Kernel-Space gehört und auf den wir deshalb keine Berechtigung haben zuzugreifen. Das Betriebssystem liefert uns daraufhin einen Fehler (Segmentation Fault) zurück, weil wir nicht berechtigt sind auf Speicherbereiche des Betriebssystems zuzugreifen und bricht unser Programm folgerichtig ab. Es ist für uns nicht möglich den Wert my_precious ausgeben zu lassen.

Da der Prozessor seine Befehle jedoch sortiert und diese spekulativ ausführt, führt dies dazu, dass der Speicherzugriff tatsächlich im System stattfindet. Nur mit der Einschränkung, dass das Betriebssystem uns diese Information nicht weitergeben darf. Diese Ausführung von spekulativen Befehlen ist Kern des Problems von Meltdown, denn sie findet statt, ohne dass vorher geprüft wird, ob der Benutzer dies überhaupt darf. Dadurch, dass der Befehl bereits ausgeführt wurde, befindet sich – und das ist besonders wichtig – das Ergebnis tatsächlich ab diesem Zeitpunkt im Zwischenspeicher (Cache) des Prozessors. Der Prozessor weiß zu diesem Zeitpunkt noch gar nicht, ob dieser Befehl gleich tatsächlich noch benötigt wird oder nicht, aber das Ergebnis befindet sich jetzt im Zwischenspeicher. Falls der Prozessor merkt, dass der Befehl falsch vorhergesagt wurde, dann werden zwar die fälschlich angenommenen Befehle aus der internen Befehlskette (Pipeline) entfernt, die errechneten Ergebniswerte bleiben jedoch weiterhin im Zwischenspeicher bestehen.

Kommen wir zu unserem Speicherbereich mit den 16 Positionen zurück. Wir wissen nun, dass unser Befehl des Zugriffs auf Adresse 12 stattgefunden hat und dass das Ergebnis im Zwischenspeicher des Prozessors liegt. Alle anderen 15 Adressen liegen nicht irgendwo im Zwischenspeicher, weil wir keine Operationen hierzu abgesetzt haben. Wir merken uns an dieser Stelle ergänzend im Hinterkopf: Ein Eintrag wurde bereits verarbeitet und dieser Wert befindet sich irgendwo im Zwischenspeicher des Prozessors.

5. Indirekter Zugriff auf den Kernel-Space

Wie kommen wir an diesen zwischengespeicherten Wert heran?

  • Im ersten Schritt allozieren wir uns als normaler Benutzer einen Speicherbereich A mit der Adresse 0.
  • Dann lassen wir einen Befehl spekulativ ausführen, welcher die Adresse 12 einliest. Wir wissen zwar noch nicht, dass dort die Zahl 1 gespeichert ist, aber wir nehmen das zum Verständnis einfach mal an. Das Ergebnis des Lesezugriffs (auf Adresse 12) soll nun an die Adresse A + B geschrieben werden (also an die Stelle 0 + 1 = 1).
  • Jetzt lesen wir nacheinander die uns erreichbaren Stellen 0 bis 11 aus und messen die Zeiten, die das System für den Lesezugriff braucht.
    Bei Adresse 0 ist der Zugriff langsam (z. B. 450ms).
    Bei Adresse 1 ist der Zugriff besonders schnell (z. B. 200ms).
    Bei Adresse 2 ist der Zugriff wieder langsam (z. B. 430ms)
    Usw.

Wir haben über den Umweg der Zeitmessung die Tatsache entdeckt, dass die Adresse 1 besonders schnell ausgelesen werden konnte. Und hier wird die Schönheit von Meltdown offenbar: Dadurch, dass wir bei Adresse 1 einen besonders schnellen Zugriff sehen, wissen wir, dass dieser Wert nicht erst wie die anderen Adressen berechnet/geholt werden musste, sondern dass dieser Wert sich bereits im Zwischenspeicher des Prozessors befunden haben muss. Anders ist diese besonders schnelle Lesezeit nicht möglich.

Das Elegante dabei ist, dass wir das Ergebnis an die Adresse A+B haben schreiben lassen. Da wir A ohnehin kennen, können wir nun direkt anhand des Abstands ablesen, welcher Wert bei Adresse 12 gestanden haben muss. Wir betrachten nämlich nun die Entfernung zwischen Adresse 0 und der Adresse die sich besonders schnell auslesen lässt (hier: 1) und wissen nun, dass der Wert bei Adresse 12 ebenfalls 1 ist.

  • Nachdem wir nun den Wert von Adresse 12 ermittelt haben, können wir im nächsten Durchgang einen Befehl spekulativ ausführen lassen, der die nächste Adresse 13 einliest usw.

In dieser Form lässt sich der gesamte (!) Kernel-Space komplett auslesen. Aus diesem Grunde wird Meltdown oft als eine der größten je gefunden Schwachstellen in Prozessorarchitekturen genannt.

6. Quellen & Weiterlesen

Die Grenzen der digitalen Selbstverteidigung

Tags: Digitale Selbstverteidigung, Web-Tracking, IP-Tracking
Last update: Oct 2020

Kleine Literaturübersicht

Es gibt viele gute Gründe im Zeitalter der globalen Informationssammlung unser Grundrecht auf informationelle Selbstbestimmung wahrzunehmen. Jeder, der sich hierzu schon mal seine Gedanken gemacht hat, ist sicherlich auf die eine oder andere Literatur gestoßen. Der sicherheitsbewusste Leser findet auf dem Markt eine relativ übersichtliche Anzahl an Titeln (chronologisch sortiert):

  • „Mich kriegt ihr nicht“ von Steffan Heuer und Pernille Tranberg (aktuell 4. Auflage von 2019, ISBN 978-3867743211)
  • „Permanent Record“ von Edward Snowden (2019, ISBN 978-3103974829
  • „Sie kennen dich! Sie haben dich! Sie steuern dich!“ von Markus Morgenroth (2016, ISBN 978-3426788189)
  • „Sie wissen alles“ von Yvonne Hofstetter (2016, ISBN 978-3328100324)
  • „Die globale Überwachung“ von Glenn Greenwald et al. (2015, ISBN 978-3426786918)

Das Buch „Mich kriegt ihr nicht“ lautet im Untertitel „Gebrauchsanweisung zur digitalen Selbstverteidigung“ und ist eine relativ pragmatische Heranführung des Lesers an die Thematik. Nach kurzer Vorrede über den Sinn der digitalen Selbstverteidigung werden einige typische Szenarien aus dem alltäglichen Leben herausgegriffen und die Relevanz bzgl. der Privatheit beleuchtet. Im späteren Verlauf ist es gespickt mit konkreten Handlungsempfehlungen und ist daher für mich eine ziemlich gute Übersicht darüber was schützenswert ist und welche Methoden man selbst anwenden kann, um die digitale Verfolgung zu erschweren.

Die Umsetzung und Nutzung der in dem Buch genannten Tipps und Tricks (im Buch „Verteidigungsstufen“ genannt) ist eine gute Ausgangsbasis, um die eigene Kommunikation, Privatheit und Identität zu schützen. Etwas komplizierter und vor allem prekärer wird die Sache, wenn von privatwirtschaftlichen Unternehmen ohne Wissen der Internet-Nutzer, Profile über diese Benutzer erstellen werden.

Datensammlung ist Realität

Dass die Sammlung von Daten nicht nur reine Spekulation, sondern Realität ist, belegen ein paar investigative Beispiele:

Titel: „How Facbook Tracks you on Android“ von Frederike Kaltheuner & Christopher Weatherhead (Dec 2018)
Link: https://media.ccc.de/v/35c3-9941-how_facebook_tracks_you_on_android/
Beschreibung: Viele Applikationsentwickler verwenden zur Verringerung des Entwicklungsaufwands die Facebook SDK. Auch wenn der Nutzer keinen Facebook-Account besitzt und sich demzufolge in einer Applikation nicht mit seinem Facebook-Account einloggt, so sendet viele Applikationen, die die Facebook DSK verwenden fleißig Daten an Server von Facebook. Hierzu gehören auch Bezeichner, die sehr eindeutig aussehen.

Titel: „An In-Depth Look Into All The Ways Google Tracks You in 2019“ von Novak Bozovic (Jul 2019)
Link: https://medium.com/swlh/an-in-depth-look-into-all-the-ways-google-tracks-you-in-2019-b158acf05b29
Beschreibung: Abgesehen von den offensichtlichen Quellen für die Datensammlung durch Nutzung der vielfältigen und natürlich auch nützlichen Google-Dienste gibt es diverse Kooperationen zwischen Google und anderen Unternehmen, die die Zusammenführung und Analyse der Datentöpfe zum Ziel haben. Das heißt zum einen, dass es schwer ist konkret um die Sammlung durch Google herumzukommen und zum anderen, dass das Google nicht das einzige Unternehmen ist, welches um den monetarisierbaren Wert von Daten weiß. Gekrönt wird der Beitrag durch ein Video, welches die Wertigkeit des digitalen Abbildes eines jeden Nutzers darstellt. Durch das ziemlich lückenlose digitale Profiling von Personen sind hohe Erwartungen geknüpft: Es wird angestrebt das Verhalten von Nutzern mit hoher Präzision vorherzusagen. Etwas weitergedacht ist dies die Grundlage dafür, dass die Verhaltensbeeinflussung erst möglich wird. Nur wenn ich eine Person hinreichend genau kenne, weiß ich an welchen Punkten er empfänglich bzw. beeinflussbar ist oder sein könnte.

Umfassendes digitales Tracking

Vor diesen beiden Artikeln hätte man noch auf die Idee kommen können, dass es reichen würde aktiv auf Facebook etc. zu verzichten. Spätestens jetzt sehen wir jedoch, dass es damit nicht getan ist. Da dieses Profiling ohne das Wissen der Nutzer geschieht und im Hintergrund geschieht, nennt man dies Shadow-Tracking – also das Tracking im Verborgenen. Um die Methoden von diesem Shadow-Tracking zu verstehen, hilft es sich zu vergegenwärtigen welche Möglichkeiten des Trackings es generell gibt:

  • IP-Adresse: Hier wird die Zuordnung zu einem Benutzer mittels IP-Adresse hergestellt. Jeder Nutzer, welcher sich im Internet bewegt, hinterlässt bei jeder Kommunikationsverbindung mit anderen Servern eine IP-Adresse. Ob dies unterschiedliche Applikationen, Betriebssysteme, Mobilgeräte etc. sind spielt hierbei keine Rolle. Jede solche sog. HTTP-Verbindung hinterlässt diese IP-Spuren in der gesamten Infrastruktur des Internet.
    Interaktive-Elemente: Eine Nachverfolgung ist auch dadurch möglich, dass kleine grafische Elemente in Mails nachgeladen oder Verbindungsversuche von genutzten Mobiltelefon-Apps initiiert werden. In diesen Fällen werden Elemente von fremden Servern nachgeladen oder Server nur zur Kontrolle kontaktiert. Da die kontaktierten Server dann die IP-Adresse des Nutzers kennen, ist dies als eine Sonderform des vorangegangenen IP-Trackings zu werten.
  • Cookie: Eine andere Möglichkeit der Nachverfolgung ersteht durch die Speicherung und Auswertung von kleinen Textdateien durch den Browser auf dem Computer. Mehrere besuchte Websites können beispielsweise bei deinem Besuch ein und das gleiche sog. Cookie nutzen und Informationen in ihm speichern und auslesen. Dadurch können Informationen auf Servern aggregiert werden, auch wenn man die eigenen Cookies jedes mal vorbildlich löscht.
  • Web-Analytics: Es ist ebenfalls möglich durch den geschickten Einsatz von Programmschnipseln in der Programmiersprache JavaScript die Bewegung des Nutzers auf einer Website in Gänze nachzuverfolgen. Wenn mehrere Websites hintereinander die gleichen Werkzeuge zur Messung der Browser-Sitzungen verwendet werden, dann ergibt dies an genau der Stelle wo all diese Informationen zusammenlaufen, ein lückenloses Tracking-Profil des Benutzers.

Die Grenzen der Selbstverteidigung

Aus Sicht der Privatsphäre wäre es ein erstrebenswertes Ziel das Tracking durch die eben genannten Punkte auf irgendeine Weise zu unterbinden. Das Problem hierbei ist jedoch, dass sich zwar Cookies und Web-Analytics dadurch verhindert lassen, dass man die Technologien Cookie-Speicherung und JavaScript im Browser gänzlich unterbietet, aber dass dies nicht für das IP-Tracking gilt. Die Ursache hierfür liegt in der initialen Struktur wie das Internet entwickelt wurde. Das Internet wurde nie mit dem Fokus der Sicherheit und Privatsphäre aus der Taufe gehoben: Jeder klassische Verbindungsaufbau beim Surfen im Internet findet vereinfacht dargestellt so statt, dass es einen Browser gibt, welcher Informationen von einem anderen Computer/Server holen möchte und deshalb immer ein (einigermaßen) direkter Verbindungsaufbau zwischen zwei Computern stattfinden muss. Der technisch versierte Nutzer nennt dies eine sog. TCP-Verbindung.