How to install a privacy friendly Jitsi Meet on Ubuntu and run it securely
Tags: jitsi installation, secure, ubuntu, linux
Last update: Jan 2021
Prerequisites
- a fresh installation of Ubuntu 21.04 LTS or Ubuntu 18.04 LTS
- verify all updates are installed by issuing
sudo apt-get update && sudo apt-get dist-upgrade && sudo apt-get autoremove- If you intend to run Jitsi on your new publicly accessible server, reachable under meet.yourdomain.com, you should change the name of your host accordingly in both files and reboot your machine:
sudo nano /etc/hostname
sudo nano /etc/hosts- These instructions also take care of the TLS certificate. If the server is meant to be in your own infrastructure, you should ensure that at least ports 80 and 443 can be reached from outside for creating the TLS certificate. That is easily overlooked.
Configuring the firewall
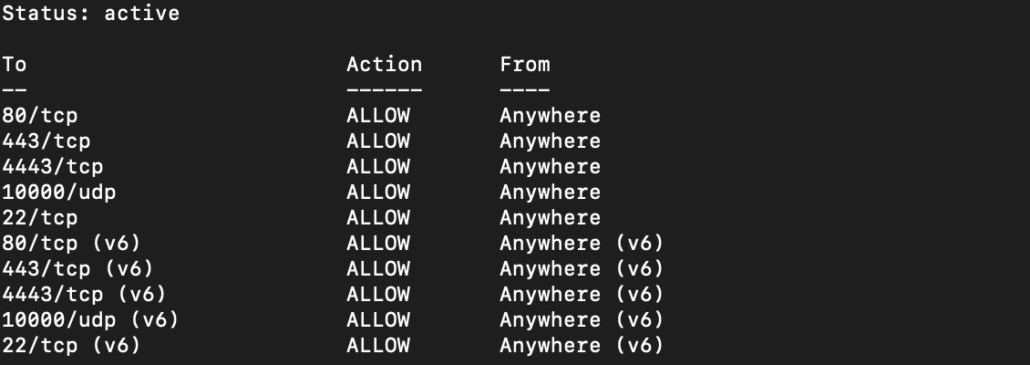
# allow HTTP, HTTPS and UDP datagram for Jitsi communication packets
sudo ufw allow 80/tcp
sudo ufw allow 443/tcp
sudo ufw allow 4443/tcp
sudo ufw allow 10000/udp

# allow SSH if you need it
sudo ufw allow 22/tcp

# enable firewall and check status
sudo ufw enable
sudo ufw status
Installing Jitsi packages
First we need to import the official Jitsi repository:
# importing the repo
echo 'deb https://download.jitsi.org stable/' | sudo tee /etc/apt/sources.list.d/jitsi-stable.list
# importing the encryption key for the repo
wget -qO - https://download.jitsi.org/jitsi-key.gpg.key | sudo apt-key add -
First we install the required packages:
# rebuildung the package list
sudo apt-get update
# installing needed packages
sudo apt-get install apt-transport-https jitsi-meet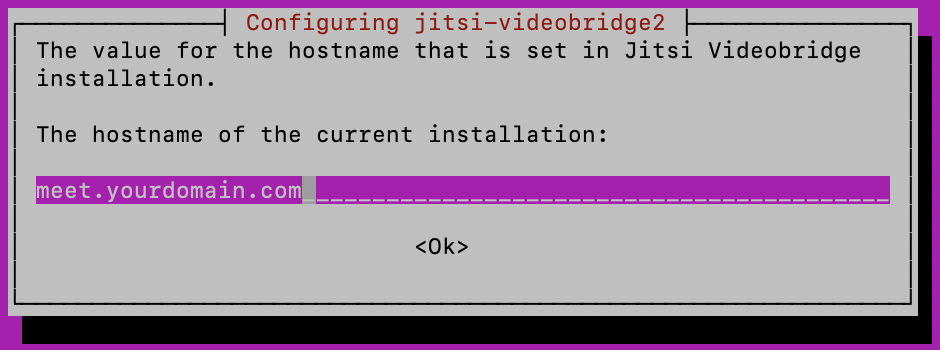
You’ll be asked for the hostname of the current installation. Use meet.yourdomain.com.
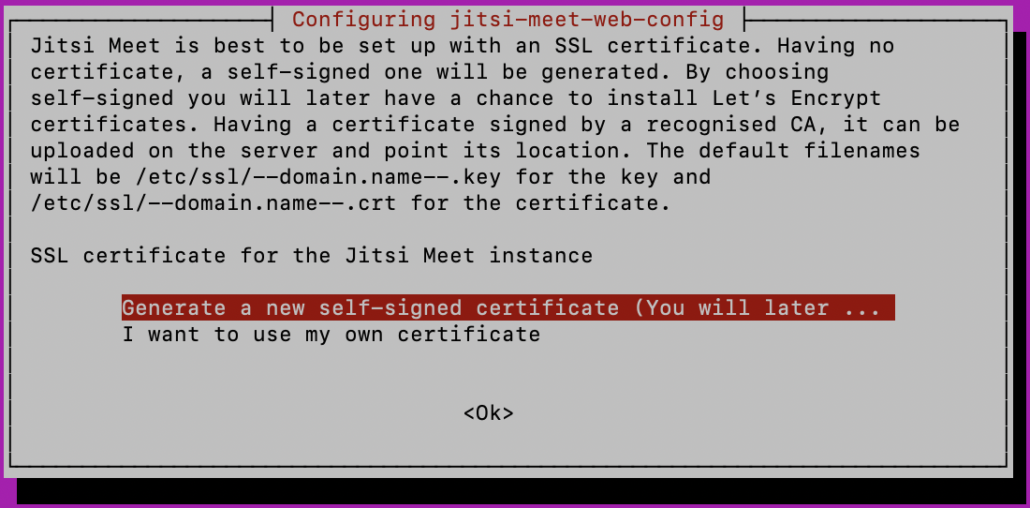
Afterwards choose to generate a self-signed Let’s Encrypt certificate.
Obtaining a TLS certificate
We will use the builtin shell script for getting our certificate but it depends on the certbox package:
# installing lets encrypt's certbot
sudo apt-get install certbot
For reasons of simplicity and avoiding some common errors we use the prepared script for fetching the encryption certificate automatically. All we have to do is to provide our mail address.
sudo /usr/share/jitsi-meet/scripts/install-letsencrypt-cert.shAccessibility test
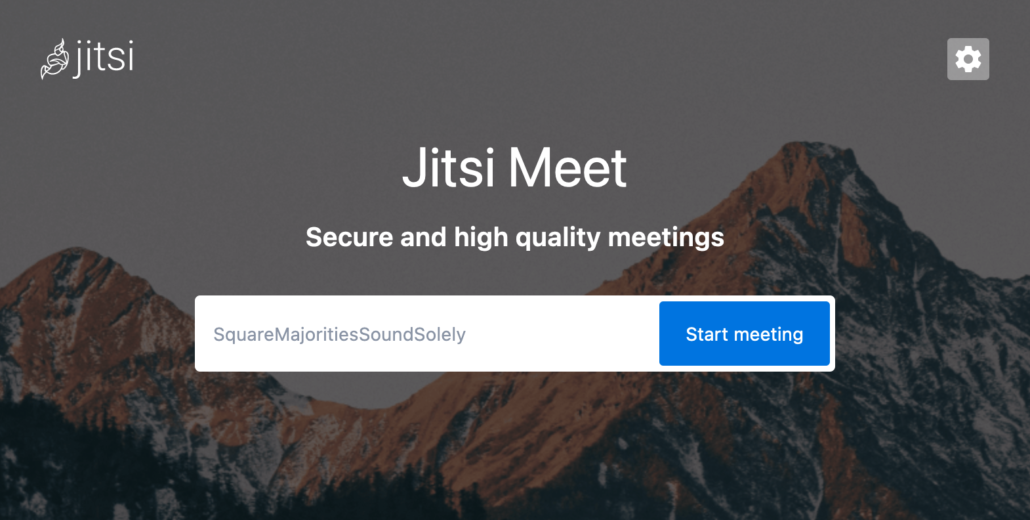
Point your preferred browser to https://meet.yourdomain.com and verify the installation. The page should be TLS encrypted and not showing any errors.
Avoiding abuse / configuring access control
By default the current installation of Jitsi is allowing everybody to enter our just created virtual meeting room without any access control. If you leave it in that state, anyone can connect to the server and transmit audio and video steams – even if no one else is inside the meeting. This inevitably leads to the server operator sending you an abuse notice and blocking your server due to high traffic. In a self-experiment, I experienced around 3000 GB of data running through my unsecured server. Don’t try this at home 😉
To restrict this abuse we’ll
- enable accounts for us (authenticated users) and for all others (guests)
- allow guests to join only if we have entered a certain room before
Turning on access control
We need to edit 3 files.
1. We turn access control on by changing the authentication type:
sudo nano /etc/prosody/conf.avail/meet.yourdomain.com.cfg.luaby changing the block:
VirtualHost "meet.yourdomain.com"
    -- enabled = false -- Remove this line to enable this host
    authentication = "anonymous"
to:
VirtualHost "meet.yourdomain.com"
    -- enabled = false -- Remove this line to enable this host
    authentication = "internal_hashed"
and allowing guests to log in by adding at the end of the file:
VirtualHost "guest.meet.yourdomain.com"
	authentication = "anonymous"
	c2s_require_encryption = false
2. We edit a file belonging to Jitsi:
sudo nano /etc/jitsi/meet/meet.testprojects.me-config.jsby changing the block:
var config = {
    // Connection
    //

    hosts: {
        // XMPP domain.
        domain: 'meet.yourdomain.com',

        // When using authentication, domain for guest users.
        // anonymousdomain: 'guest.example.com',
to:
var config = {
    // Connection
    //

    hosts: {
        // XMPP domain.
        domain: 'meet.yourdomain.com',

        // When using authentication, domain for guest users.
           anonymousdomain: 'guest.meet.yourdomain.com',
3. We edit the Jicofo element:
sudo nano /etc/jitsi/jicofo/sip-communicator.propertiesby adding a second line at the end of the file. From:
org.jitsi.jicofo.BRIDGE_MUC=JvbBrewery@internal.auth.meet.yourdomain.comto:
org.jitsi.jicofo.BRIDGE_MUC=JvbBrewery@internal.auth.meet.yourdomain.com
org.jitsi.jicofo.auth.URL=XMPP:meet.yourdomain.com
Adding XMPP users
Now the access control is configured and we have to add users to XMPP/Prosody in order to authenticate ourselves and to create rooms:
sudo prosodyctl register <username> meet.yourdomain.com <password>Restart everything
because we have finished configuration:
sudo systemctl restart prosody && sudo systemctl restart jicofo && sudo systemctl restart jitsi-videobridge2Test your Jitsi installation
Point your browser again to https://meet.yourdomain.com and try to create a conference room. Usually (before our efforts above) a room would be created instantly and you could join. Now you are getting the hint that your room hasn’t been opened yet. Only you can open it by hitting the button to authenticate in order to allow others in.
Customizing your Jitsi installation
If you want to change the default branding you can edit the interface configuration file:
sudo nano /usr/share/jitsi-meet/interface_config.jsYou might find the following line/settings useful:
# line 5 changes the page title
APP_NAME: 'Jitsi Meet',

# line 49 changes the logo within the room
DEFAULT_LOGO_URL: 'images/watermark.svg',

# line 50 changes the default name for guests
DEFAULT_REMOTE_DISPLAY_NAME: 'Fellow Jitster',

# line 51 changes the logo on the first page
DEFAULT_WELCOME_PAGE_LOGO_URL: 'images/watermark.svg',

# line 100 changes the animation of generic room names
GENERATE_ROOMNAMES_ON_WELCOME_PAGE: true,

# line 113 changes the logo link
JITSI_WATERMARK_LINK: 'https://jitsi.org',

# line 167 changes the visibility of existing rooms
RECENT_LIST_ENABLED: false,
Leave a Reply
Want to join the discussion?Feel free to contribute!